I found out recently that my Salivating Gremlins has made an encore appearance in the recently released Magic the Gathering set, Double Masters. Initially created for the Kaladesh set, it was great to see that this card has received a reprinting. It was always a favorite of mine, and I guess it had stats suited for a second use. For those interested, I made a post about the process and steps that went into creating this painting. Here is a look at the final art for Salivating Gremlins.
With a new printing of the art, that means that there are now new artist proofs available. Both standard artist proofs and foil artist proofs are now on my store for those interested. All artist proofs are available with and without sketches. All of the details and information are on my store.
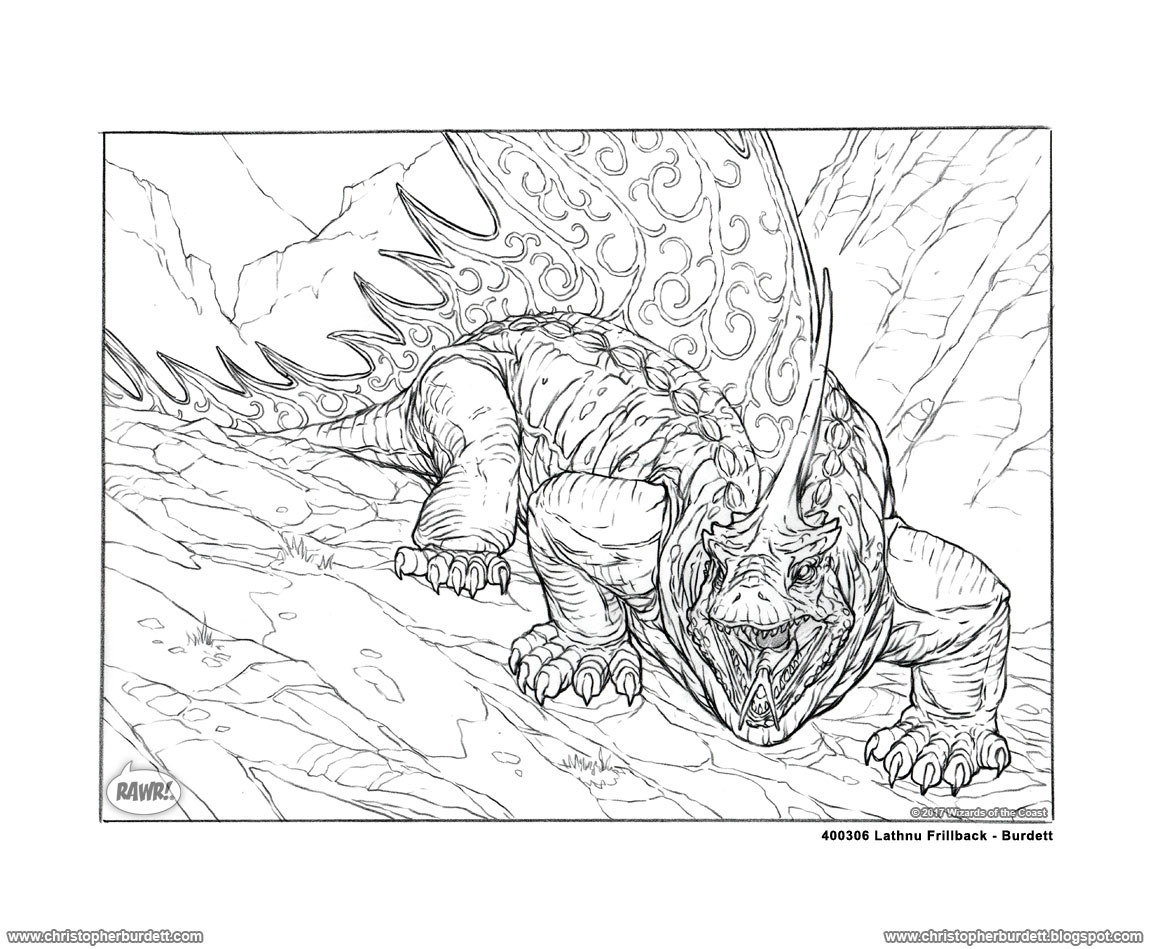
Today I have for you an overdue post about the process and steps that went into a Magic the Gathering piece of mine that I first shared with you way back in January of 2017, the Lathnu Sailback. I fought this particular painting tooth and nail through the entire process. To start things off, here is how the final art for Lathnu Sailback out...
Unlike a lot of my work, I had a real struggle on my hands with this one... which is funny since it is a giant lizard monster painting. The thumbnails and drawing were pretty straightforward, but after that, it was a lot of work, revisions, and frustration to get this one over the finish line. The focus of this piece was a large lizard monster with a sailback. The sail needed to be red and the body dark gray. That was about it. I just had to make it cool and get it done, which turned out to be a bit harder than expected. I got to work on the thumbnails, and I was happy with how they tuned out...2
While "C" was the winning thumbnails, I am still drawn to options "B" and "D." I wonder how one of these versions would have turned out. It was important to draw attention to the sail, and in a lot of these, I was trying to backlight it, so there were a glow and cast color. As with all my work, I have planned out the lighting from the beginning. With a selected thumbnail, it was time to get started on the drawing...
The drawing was approved without comment, and I was all set to move forward with my process. I was still feeling really good about the assignment, and everything seemed to be in order. I was looking at a lot of references, making sure all my ducks were in a row. Progressing as planned. Here is a look at a time-lapse I filmed of me working on the drawing. You can view it here or follow the link along to YouTube...
With the drawing approved, I worked up a tonal study to get my value down... or at least what I think they will be at this point. Things can change, but I do the best I can at the moment. Still, everything is moving along as it should.
Okay, here we come to the actual painting process when things go a little funny, and I have to fight with the painting through most of the process. If you follow my blog and my process post, you should immediately see the there are a lot more steps depicted here than normal. At some point in the process of painting, it became clear to me the anatomy of the lizard was just not working for me. It seemed fine through the drawing stages, but now it just was not clicking. Also, the lighting set up that I was envisioning was not working well either. While I had a direct light source on the creature, it was a dark gray creature, and a lot of it was in shadow. Getting the sail glow and cast light was also proving to be a bit more tricky. ...even with reference. Here is a look at the process progression for this piece...
It might be a little hard to tell from these step by step images, but the leg and head anatomy change a lot, and there is a lot of push and pull with the lighting. A lot more of all of these things compared to my usual painting. Things always change, that is a given, but they typically don't go through this much editing throughout this much of the painting. In a normal painting of mine, the major changes either come at the beginning when I realize there is an error I show how missed in the drawing, or at the very end when I am making the last edits to make sure everything is looking its best.
Quickly made maquette for lighting reference
The above image is a quickly made maquette that I bashed together one evening while painting to make sure I was on the right track. I dropped everything while working and ran to the store to get some clay and some transparent plastic sheeting. I put it all together and worked out the lighting ... and I was happy to see that i was on the right track. It did allow me to update the lighting in the painting to get it to look a bit more believable. Here is the animated process for this painting that better illustrates all the steps and changes this piece went through. You should all be able to see at which point I made the maquette and updated the lighting.
I know many artists who constantly change and update their paintings while working on them, especially those that paint digitally. That has never been my style. So the amount of editing in this one really threw me off and had me reeling through most of the painting. With so many changes, it shook my resolve and made me question my abilities on this one. Not the best place to be when working on client work. In fact, I turned in an initial final for this piece that was not accepted, and I had to make additional edits too. Here is a look at the original version of the Lathnu Sailback...
The bones and saliva needed to go to make it more Kaladesh, but I was also asked to rework and better address the rim and edge lighting. I had been looking at references and was sure I had done a good job, but in the end, I needed to update it. Here again, is the approved version of the Lathnu Sailback and the final production card...
I am still playing catch up with many things that should have been on the blog months ago. On top of everything this post was suppose to be up yesterday. I guess when you are months behind another day won't hurt. More on this another day...
Today I have for you a look at a Magic the Gathering art book that came out earlier this year. Recently the good folks at Wizard of the Coast have been making these REALLY nice art books around each Magic the Gathering wave. I have been lucky enough to to be featured in two of them, which is nice. I have a history of missing out on these types of things, they either stop be the time I show up or start after I leave. Not this time! The Kaladesh books contains a TON of the amazing art created for the two Kaladesh expansions. These books are great since you can see the art much larger than you would on the cards.
The Art of Magic the Gathering - Kaladesh
I was really happy with how my work looked in the book. Two of my pieces made it in and I could not be happier. The Salivating Gremlins got the 3/4 spread treatment and the Narnam Cobra got a half page. Not sure I have much more to say. If you have a chance to get your hands on the book I highly recommend it! Here are some images of the pages for your viewing pleasure...
Salivating Gremlins
Narnam Cobra
That is all for another Tuesday on the blog, see you back here on Wednesday! Until then...
For more samples of my work or to contact me regarding my availability head over to my website: www.christopherburdett.com
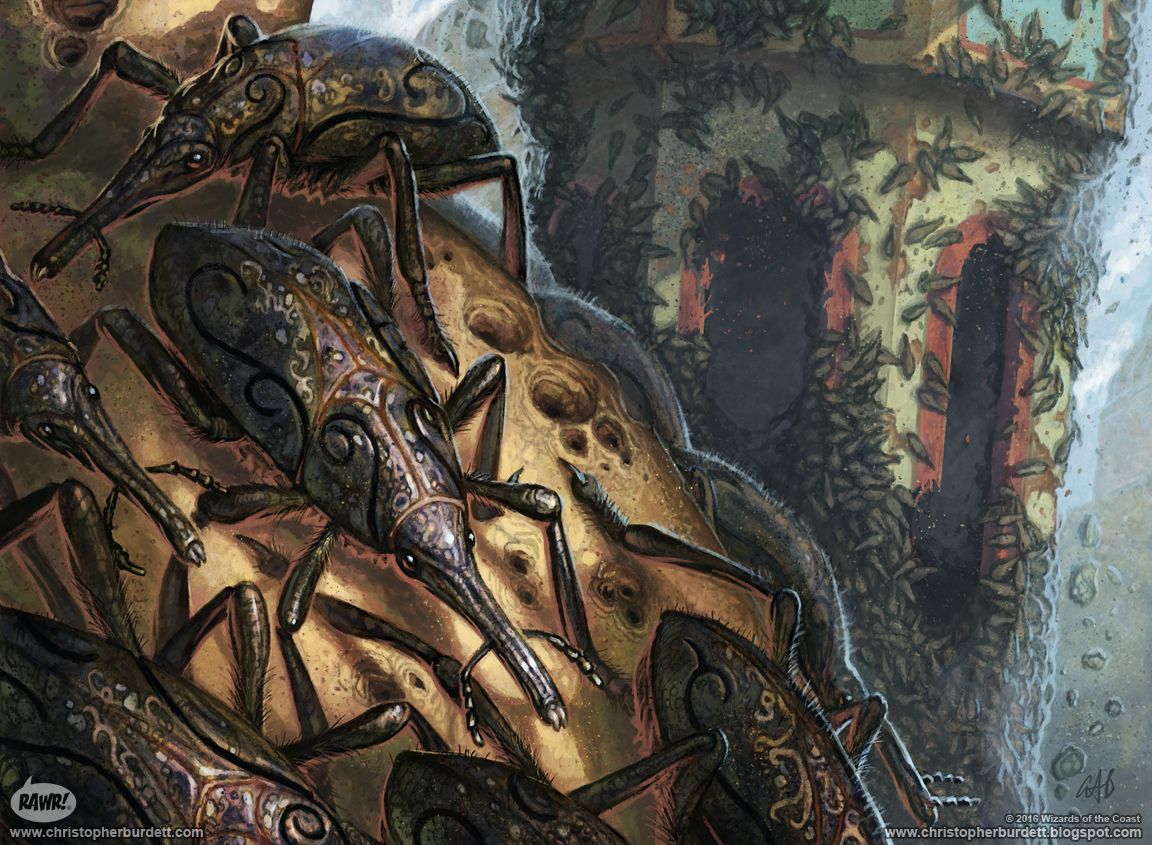
Today I have for you an overdue post about the process and steps that went into a Magic the Gathering piece of mine that I first shared with you way back in September of 2016, the Fretwork Colony. This was a challenging one and took a bit of work to figure out and make work in the end. To start things off, here is how the final art for Fretwork Colony out...
Thumbnails of course start things off. This piece needed to show two very different things. One being a swarm of very small insect monsters that I got to design and the second being their effect on very large structures like buildings. For some this might be second nature, but for me, it takes some time and thought on how best to construct a scene that is both large and small. Much like when a monster is actually made up of lots of smaller elements to make a greater whole, I need to put my thinking cap on and plan it all out well ahead of time. Thankfully, the more you do the easier it gets. Funny how that is. After weighing my options I decided to go in the direction of having two element, a foreground closeup an a background effect, composition rather than trying to show all of the action on one continuous plane. Here are how the thumbnails turned out...
Option "D" was the winner this time around and looking back at them now it seems to have the best balance of elements, some nice overlap, and reads the best left to right. Sometimes looking back at these thumbnails I am curious about what could have been with other options, but this time I think it was best that "D" was the winner. Now that I had an approved thumbnail it was time to get the finalized drawing worked up. Here is how the final drawing turned out...
There is sometimes a weird limbo I find myself in when it comes to working on the drawing and thinking ahead to the painting. How much detail should I put in? What is too much? What is a waste of time and will be lost to the painting process? Do I REALLY need to draw every single little bug monsters or will it all come together when I am painting? In the end I draw it all and hope for the best. I want to have a nice drawing at the end of things and over the years I have learned that the drawing is as important to the painting as everything else, if not more. Also, here is the tonal study for this piece...
The drawing was approved without comment and it was time to get started on the painting. Layer separation and easy readability was very important on this one and there was a lot of adjusting and futzing that went on while I worked on this one. In just 18 easy steps, you too can have a digital painting... or not...
While the step by step might now show it, there was a lot of adjusting that went on during the creation of this piece. Making sure the background felt like it was in the distance AND still readable was very important. The viewer needed to see the bugs destroying the building, but it also need to be back other there and not pulling too much from the foreground and the details. I also needed to make sure the insects in the foreground were clear, interesting, and read well. You can see how their chroma and details changed as I worked on this piece. Making sure they popped off the metal roof they are on was important. Here is an animated progression of this piece coming together so that you can better see each step layering to create the final painting...
Of the three pieces that I did for Kaladesh this was my least favorite. Don't get me wrong, I have nothing against this piece and I think it was successful. I prefer the other two pieces more when it comes down to it. The other two are more in my wheelhouse regarding subject matter and over all feel. This one challenged me, which is a good thing, and so the process was a little more involved and so skews my view of the piece. They all can't be your favorites and that does not make them bad or that there is anything wrong with them.
Again, here is the finished Fretwork Colony painting and the final production card...
Today I have for you an overdue post about the process and steps that went into a Magic the Gathering piece of mine that I first shared with you way back in September of 2016, the Narnam Cobra. This is by far my favorite piece from the Kaladesh block and I am still really happy with how it turned out. To start things off, here is how the final art for Narnam Cobra turned out...
As always, thumbnails got things started. For this piece I needed to design a mechanical cobra based on the art direction of other mechanical animals in the style guide. I really like the idea of this and got to work designing the cobra and working out an environment that best suited it. There was mention that this piece had a connection to green and I think there was some mention to it being deadly, so I wanted to try to touch on both those things in this piece. The green aspect would come later, but I was imagining the cobra entering a home or building ready to dispatch a target it was sent after. Coiled and ready to strike I was imaging the cobra back lit with some nice frontal glow. Here are how the thumbnails turned out...
Option "D" was the winner, but there was concern that the columns were just too real world like and I was asked to rework them to make them more Kaladesh. This was an easy enough request and I was happy to make it. Here is how the updated thumbnail turned out...
The updated thumbnail was approved and I was given the go ahead to work up a finalized drawing. This piece had a ton of pattern and detail in it and making sure it all worked, looked good, and obeyed perspective took some time. In the end I was really happy with how the drawing turned out. Here is how the final drawing turned out...
For myself, I worked up a tonal study of the piece as well. Figuring out if the plan in my head is going to actually work out the way I want it to. Here is the tonal study for this piece...
Now that I had an approved final drawing it was time to get started on the painting. There were no further comments or requests from production so it was just a matter of getting started. In just 18 easy steps, you too can have a digital painting... or not...
This piece was a breeze to work on. It just took time and a bit of pushing and pulling to make sure all the different planes read and worked well. I wanted a really bright back light with a dark middle ground and an eerie glow lighting the foreground. I think I got it all to work. There was the shine and reflection of the gold and the glow of the aether in the cobra to worry about, but I think I controlled it all. There was a lot here to keep wrangled in, but at the end of the day it just takes time and a slow even pace to get it done. Maintaining the low contrast muted background and pushing the columns backwards ended up being some of the hardest aspects to this piece. Here is an animated progression of this piece coming together so that you can better see each step layering to create the final painting...
As mentioned above, this is still my favorite of the Kaladesh block and still one of my favorite Magic pieces to date. I think it reads well on the card and in the art and creates a nice mood. For me it reminds me of the kind of things that drew me to Magic in the first place. It might seem like a regular card, but for me it was a big challenge to make it special for myself, and hopefully the players.
Again, here is the finished Narnam Cobra painting and the final production card...
Today I have an overdue post about the process and steps that went into a Magic the Gathering piece of mine that I first shared with you way back in September of 2016, the Salivating Gremlins. This was an enjoyable piece, and I was so happy to have a chance to work on some of the Gremlins for the Kaladesh expansion of Magic. To start things off, here is how the final art for Salivating Gremlins turned out...
Starting things off as always are the exciting and fun thumbnails. The focus of this piece was a group of Gremlins finishing up a meal of some hapless piece of tech. Since the gremlins were already designed, it was all about arranging them in an interesting composition and making them look cool. I really wanted to do something interesting with the lightning on this one, so I was really focusing on the arrangement of the three bodies, the background, and foreground light elements and hopefully telling a little bit of a narrative. That narrative being the viewer who has just opened a door, has come upon the gremlins and their meal, and one of the gremlins is looking up suddenly to face the viewer. Maybe that came through, perhaps it didn't, but that was what I was going for with this piece. Here are how the thumbnails turned out...
Option "C" was the winner here. It does read the best with the whole light spilling in and highlighting the startled gremlin. There was one note from production to remove the multi-pointed stars from the background elements and make them more in line with other shapes in the style guide. I was happy to comply and sent in a revised thumbnail...
The thumbnail was approved, and I was given the go-ahead to work up a finalized drawing. This was super fun to work on, so I was happy to spend some time working on some nice gremlin figures. Here is how the final drawing turned out...
For myself, I worked up a tonal study of the piece as well. Figuring out if the plan in my head will actually work out the way I want it to. Here is the tonal study for this piece...
The drawing was approved with a caveat to ensure the half-eaten piece of tech is nice and fancy and has a lot of detail and ornate, but eaten details. A straightforward request any day of the week. With an approved drawing, tonal study, and a single note from production, I was ready to get started on the final painting of the Salivating Gremlins. Here is a break down of the painting coming together. Each step reflects a different layer in the painting's file. You can see how the layers add up to make the final image. In just 18 easy steps, you too can have a digital painting... or not...
This piece came together fairly quickly and easily. There were a couple tweaks requested by production at the end to enhance the blue glow and to widen the eyes of the gremlins to make it look less intelligent and more like an animal. This was all straight forward request that I was happy to do. Here is an animated progression of this piece coming together to better see each step layering to create the final painting...
Salivating Gremlins - Animated process progression
I still like this piece a lot. I was pleased with how a couple of my cards for Kaladesh turned out. They just clicked while I was working on them. This is, of course, really great when it happens, but it is not necessarily going to happen every time. When it does, it can really make the painting go that much faster and easier.
Fun fact, this piece was initially titled Clutch of Gremlins. It is very common for the names of cards to change throughout production. Still, since there was no mention of the gremlins salivating in the original art order, that was my addition. I would like to think I influenced the final name for this piece. This might be a common occurrence, but this was the first time my art influenced the name, and I think that is pretty neat.
Again, here is the finished Salivating Gremlins painting and the final production card...