Monday, June 28, 2021

Cryptic Knight - The Grand Bazaar of Ethra VanDalia

After too long of a gap, I am happy to share another new piece from The Grand Bazaar of Ethra VanDalia. This illustration is the third completed work for Book Two: The Completed Circle. This piece focuses on a skilled blade master who wields one of the fabled Qurynel swords. The Qurynel blade is said to be so smooth and polished that it reflects any light giving it the appearance of it glowing. I present to you the Cryptic Knight.

Cryptic Knight
The Grand Bazaar of Ethra Dalia - The Completed Circle
13 x 17 - Pencil, ink, and acrylic paint on paper
Original - SOLD© 2021 Christopher Burdett
 
Cryptic Knight - Drawing 
13 x 17 - Pencil on paper
© 2021 Christopher Burdett
 
Typically, I share the final art and the line drawing that will eventually become the line art in a coloring book. As with all of my work, I start with references and a digital sketch to work out the idea in my head for these images. You should be able to draw a straight line from the digital sketch to the finished art. More detail is added, and elements are fleshed out along the way, but the overall piece is locked in during the sketch. Here is the sketch for the Cryptic Knight.
 
Cryptic Knight - Sketch 
13 x 17 - Digital
© 2021 Christopher Burdett 
 

Though considered the product of fairy tales and folklore, there is some evidence that the Qurynel Blademasters existed. Who they were and where they came from has been lost to the ages, but small fragments of highly reflective metal still exist in shrines and museums. When the young farmhand was about to run afoul of a blood-thirsty band of brigands, out of the night came a flashing blade.

As a bonus, I have some images of the rendering process of this piece so that you can get a better idea of it taking shape. 
 
 
Cryptic Knight - Process
© 2021 Christopher Burdett

That is all for another exciting Monday on the blog. See you back here on Wednesday! Until then...    

For more samples of my work or to contact me regarding my availability, head over to my website: www.christopherburdett.com

Wednesday, June 23, 2021

Carrion Stalker - Dungeons & Dragons - Process

Today, I am happy to share the process and steps that went into one of my two illustrations in the recently released Dungeons & Dragons supplement, Van Richten's Guide to Ravenloft. For this installment, I am sharing the Carrion Stalker. The Carrion Stalker was described as an alien horseshoe crab, and that is definitely in my wheelhouse. Here is the final painting for the Carrion Stalker.

Carrion Stalker
Van Richten's Guide to Ravenloft
11 x 14 - Digital
Art Director - Kate Irwin
© 2021 Wizards of the Coast LLC

When I was working on this piece, I was unaware that it had any connection to the Carrion Crawler. I thought it was a completely new creature that originated in space. As I said above, it was described to me as an alien horseshoe crab. Well, let me be clear, an alien horseshoe crab that sat upon a mass of tentacles and pulled itself along by pincer claws. This all seemed like a perfectly normal day in the Realms, so I got to work on some thumbnails. I grew up around horseshoe crabs, so I am more than familiar with them. I did not look at any reference for this piece. Instead, I wanted to play with shapes and forms and make something cool. I was asked to do an additional design of what the underside looked like. It needed to have a large mouth ringed in teeth at the center of the tentacle mass. In addition to the final painting, I would be providing a pencil drawing of the underside view. Here are the thumbnails I supplied for the Carrion Stalker.

Carrion Stalker - Thumbnails
© 2021 Wizards of the Coast LLC
 
Carrion Stalker Underside - Thumbnails
© 2021 Wizards of the Coast LLC
 
I created the thumbnails in pairs. The 'A' designs corresponded and so on. You might notice that I indicated to production which thumbnail pairing was my favorite. It is subtle, but I think it is an effective way to show my personal feelings to my art director and the production team. As it would turn out, they fell for my visual cues, or maybe they naturally like option 'B' best; whatever the circumstances, they picked my favorite, and it was time to move forward on the drawings. Here is the final drawing for the Carrion Stalker.
 
Carrion Stalker  - Drawing
Van Richten's Guide to Ravenloft
11 x 14 - Pencil on paper
Art Director - Kate Irwin
© 2021 Wizards of the Coast LLC

Here is where things went a little wrong for me, but not in the way you might think. The drawing was approved, and I was all set to start on the painting. The only issue was that I forgot to scan the drawing when I was finished with line art. While I am now finishing the drawings with shading and texture to have a more pleasing end piece and a lighting guide, I still use the line art of the drawing as the base of the painting. The technique to prep the drawing for the painting stage works best with line art, but not as much with a rendered drawing. Not having the line art slowed me down slightly when I started the painting since I couldn't separate which mass of grays was tentacles or shell. Here is a look at the painting coming together.

Carrion Stalker - Process
© 2021 Wizards of the Coast LLC

In the end, it was a straightforward painting, even with my goof up with the line art scan. Once I got into the painting a little and began to define forms, the gray masses started to take shape, and it was smooth sailing. You might notice that near the end, one of the lateral spikes dramatically increases in size. I had reduced it while I was drawing because, at the time, it looked too big. When I was nearing the end of the painting, it was obvious to me that I had reduced the spike too much and it needed to be inlarged. A easy fix, but one I had thought I already addressed. 

Now for that underside view I mentioned before. I created the drawing based on the approved thumbnail. The only issue was that at some point along the line it was no longer approved. There were some concerns about the shape of the mouth and after turning in the finsihed drawing I was asked to make the mouth horizontal. Anotomically, I don't think a horizontal mouth works as well, but I was aksed to change it, so I changed it. Rather than attempting to edit the drawing either traditoanlly on digitally I redrew the entire piece over again with the updated mouth. Why have one drawing when you can have two? Here are the two versions of the underside view of the Carrion Stalker.

Carrion Stalker  - Underside drawing original
Van Richten's Guide to Ravenloft
11 x 14 - Pencil on paper
Art Director - Kate Irwin
© 2021 Wizards of the Coast LLC
 
Carrion Stalker  - Underside drawing final
Van Richten's Guide to Ravenloft
11 x 14 - Pencil on paper
Art Director - Kate Irwin
© 2021 Wizards of the Coast LLC

The painting was approved without revisions and once the second underside drawing was submitted that too was approved. I am pleased with how this one turned out. I wanted to do acheive a specific look and feel for the tentacles and I think I suceeded. Here again is the final painting for the Carrion Stalker.

Carrion Stalker
Van Richten's Guide to Ravenloft
© 2021 Wizards of the Coast LLC

 That's all for another exciting Wednesday on the blog. See you back here on Friday! Until then...   

For more samples of my work or to contact me regarding my availability, head over to my website: www.christopherburdett.com

Monday, June 21, 2021

Ology Brewing Fourth-Anniversary Beer Labels

If you following me on Facebook or Instagram, likely, you have already gotten a glimpse of the three beer labels that I created for Ology Brewing. Today, I have for you a closer look at the final art, the original drawings, and the labels. These three labels were part of Ology's fourth-anniversary celebration, and each beer was a limited run batch created for the event. Creating a beer label, let alone three, has been a bucket list of mine for some time, and I could not be happier with everything involved with this project. A huge thanks to Steve Leacock (who you may know did all the layout and typography for The Grand Bazaar of Ethra VanDalia) for getting me involved with Ology and doing all the design and type work with my art and to everyone at Ology, who have been nothing but gracious and excited about working together. This has definitely been a fantastic project to be a park of. Enough talk; bring on the beer labels.

 
Trisolaran Tardigrade, Astronomical Axolotl, and Stellar Sloth
Ology Brewing
Photo courtesy Ology Brewing

For the set, Steve and I had the idea of doing a retro space theme featuring cute and popular animals. We brainstormed a list of animals I wanted to draw and animals that would be popular and look good on the labels. The tardigrade was a given from the beginning and was a must for Steve. The tardigrade was really impetuous of the entire theme. After that, we agreed on the axolotl and the sloth. I produced them in that order and provided full thumbnails and comps for the tardigrade to get approval from Ology as we moved along. This process started in November of last year, but they were completed in rapid session earlier this year. Starting things off, here is the Trisolaran Tardigrade.

 
Trisolaran Tardigrade
Beer Label for Ology Brewing
© 2021 Christopher Burdett

It was important that the images popped and had some color harmony. Everything was established with this first piece, and from there, it was a matter of adjusting the palette. While the final had a digital color finish, the pencil drawing needed to be visible for the look and feel we were aiming for. Bold black lines and textured gradients were the goals visually for me.

 
"The Warrior"
17 x 14 - colored pencil and acrylic paint on paper
This is the original art for the Trisolaran Tardigrade beer label
© 2021 Christopher Burdett

I made the drawings as large as I could, working from home. This allowed me to make the drawing 17x14. I wanted to have a lot of fun with the drawing and to include as much detail and texture as possible. I also included as much bleed as I could so that Steve had plenty to work with when doing the final layout. In the final label, you can see how much ended up getting cut, but that is part of the process. I made it big so that there was plenty to play around with.

 
Unused Trisolaran Tardigrade beer label
One comes with the original drawing

Again, I can not say how pleased with how these turned out. It was an extraordinary moment to turn a corner during my tour of Ology Brewing to see a palette of beer with my labels on them.

 
Trisolaran Tardigrade
Ology Brewing
Photo courtesy Ology Brewing

Now that the first label was completed, laid out, and approved by Ology, I got to work on other two. In the end, I think the axolotl is my favorite, but the tardigrade will alwasys be special since it was first. The process for the other labels was the same as the first, it all went quicker since I had a template and production flow to follow.

 
Astronomical Axolotl
Beer Label for Ology Brewing
© 2021 Christopher Burdett

While the beers had official names, I had my own names for the drawings, which I thought about as I was working on them. I wanted each to have their own character and purpose. While the tardigrade was a warrior, I saw the axolotl as a scientist, floating through space documenting its discoveries.

 
"The Scientist"
17 x 14 - colored pencil and acrylic paint on paper
This is the original art for the Astronomical Axolotl beer label
© 2021 Christopher Burdett

While I am happy with all the labels, there is something about the colors on the axolotl that I am more pleased with. But, to each their own, I know the sloth is a favorite to many.

 
Unused Astronomical Axolotl beer label
One comes with the original drawing
 
 
Astronomical Axolotl
Ology Brewing
Photo courtesy Ology Brewing

Did someone say sloth? This chill dude is doing he best to fix a situation he likely made worse. From just a little of the feedback I have seen I think the sloth became a fan favorite and the beer inside the can intrigued many.

 
Stellar Sloth
Beer Label for Ology Brewing
© 2021 Christopher Burdett
 
 
"The Mechanic"
17 x 14 - colored pencil and acrylic paint on paper
This is the original art for the Stellar Sloth beer label
© 2021 Christopher Burdett
 
 
Unused Stellar Sloth beer label
One comes with the original drawing
 
 
Stellar Sloth
Ology Brewing
Photo courtesy Ology Brewing
 
Again, a HUGE thanks to everyone at Ology for making this such an excellent experience and to Steve Leacock for pushing to make it happen. I hope that these will be just the start of my involvement with Ology.

That's all for another exciting Monday on the blog. See you back here on Wednesday! Until then...

For more samples of my work or to contact me regarding my availability, head over to my website: www.christopherburdett.com

Friday, June 18, 2021

Nolzur's Marvelous Miniatures - Aarakocra

Recently finding the Nolzur's Marvelous Miniatures release of the Eidolon opened the flood gates of a ton of miniatures based on my designs and illustrations that I was completely unaware of. I am not sure if I found them all, but I certainly found enough. I will be sharing them with you over the next few weeks. To start things off, I have for you a lovely miniature based on my designs and work on the Aarakocra that I updated and illustrated for 5th Edition Dungeons & Dragons. Looking at the miniature again, it is possible the pose what pulled from the illustration of the Aarakocra from the D&D supplement Princes of the Apocalypse by Claudio Pozas. The Aarakocra first became a miniature in 2014, but this updated version is a lot more to my liking. To start things off, here is the illustration for the Aarakocra.

Aarakocra
 Dungeons & Dragons - 5th Edition Monster Manual
8x11 - Digital
© 2014 Wizards of the Coast

Nolzur's Marvelous Miniatures release of the Aarakocra, it is part of a two-pack of miniatures. The other mini in the set is a Harpy. As previously mentioned, I think this miniature looks excellent and really breaths a lot of life into my design. I never had the opportunity to show it in action. During the design phase for 5E, it was all about getting the design across, and when it came time for the illustration in the Monster Manual, I was asked again to present it more or less in a strong standing pose. If I had to do it over again, I might have pushed for something more dynamic. Here is the unpainted Nolzur's Marvelous Miniatures release of the Aarakocra.


Nolzur's Marvelous Miniatures - Aarakocra

As I have stated above, the Aarakocra has already been made into a miniature. It was a prepainted mini that was part of a standalone miniatures game that is now no longer in production. It seemed interesting, but I never played it. It was an early way to get miniatures based on 5th Edition versions of the monsters, though. Here is the Aarakocra from that early line of minis.

Aarakocra - Miniature
Icons of the Realms
2014

Lastly, here is the final concept design that I did in the design phase of 5th Edition. This particular monster when through several iterations before it got to this point. Some of which needed to be killed with fire. But that is the way of things.

Aarakocra - Final Concept
© 2014 Wizards of the Coast

That's all for another exciting week on the blog. See you back here next week. Until then... 

For more samples of my work or to contact me regarding my availability, head over to my website: www.christopherburdett.com

Wednesday, June 16, 2021

Selected Recent Artist Proof Drawings

Today I have for you a recent artist proof that I added drawings to its back. If you are interested in getting any of these for yourself, just follow the links to my store. Here is the recent monster drawing.

 
The request was a John Carpenter's Thing drawing, precisely the dog thing. 

That's all for another exciting Wednesday on the blog. See you back here on Friday! Until then... 

For more samples of my work or to contact me regarding my availability, head over to my website: www.christopherburdett.com

Friday, June 11, 2021

Custom Ankheg Miniature by Jason DuBois

If you know me and know this blog, you will know the long history and the love I have for the D&D monster, the Ankheg. The Ankheg and I go back a way professionally and even further as a monster lover. The official miniature that was released last year was an exciting time. Even with a miniature available in stores, it has not stopped the crafters and gamers from making their own. I recently came across a custom Ankheg miniature made by Jason DuBois, and I had to immediately ask if I could share it on the blog. Jason was gracious enough to let me share his work. I think it looks great, and he did an excellent job capturing the 5th Edition Ankheg look and feel. Here are some of Jason's images of his work.

Ankheg miniature by Jason DuBois.
Images courtesy of Jason DuBois.

That's all for another exciting week on the blog. See you back here next week! Until then...

For more samples of my work or to contact me regarding my availability, head over to my website: www.christopherburdett.com

Wednesday, June 9, 2021

Dead Birds - Part 2: Shop Images

Dead Birds - 2004
 
In my previous post, I shared the concept work that I produced for the film, Dead Birds. This post will focus on the work done in the shop by the makeup effects team that I was a part of. I want to be crystal clear, the work presented here results from a group of skilled and talented artists and craftsmen who spent many weeks working under tight deadlines to produce this work. I played a minor role in much of this work, save for creating the concept designs. Likely, I was also involved in cleaning up the seams on the silicon and foam latex and eventually some of the paintworks. To be honest, much of this time was a blur, and I can't recall all that I was doing and what exactly I did on this particular project in the shop. I was always an extra pair of hands used where I was needed. Also, we were working on other projects simultaneously, so it was likely I was involved in that other work as well.
 
I was the shop's historian and archivist, which meant that I was constantly recording and documenting what was happening in the shop on our various projects. This responsibility is why I have access to all of these images, and many, many more, after all these years. Please keep in mind, the things I most definitely had no part in with this work are the sculpture, mold making, casting, and animatronic work. I have intentionally used images that contained as few people as possible and no faces. While I remember most of the team I worked with, I don't recall everyone's names. Also, at least two of the people that I worked with on this film are now dead. It is simply easier to keep everyone out of the images rather than making sure everyone gets appropriate credit. With all the caveats address, it is time for some monster-making.

 The Creature

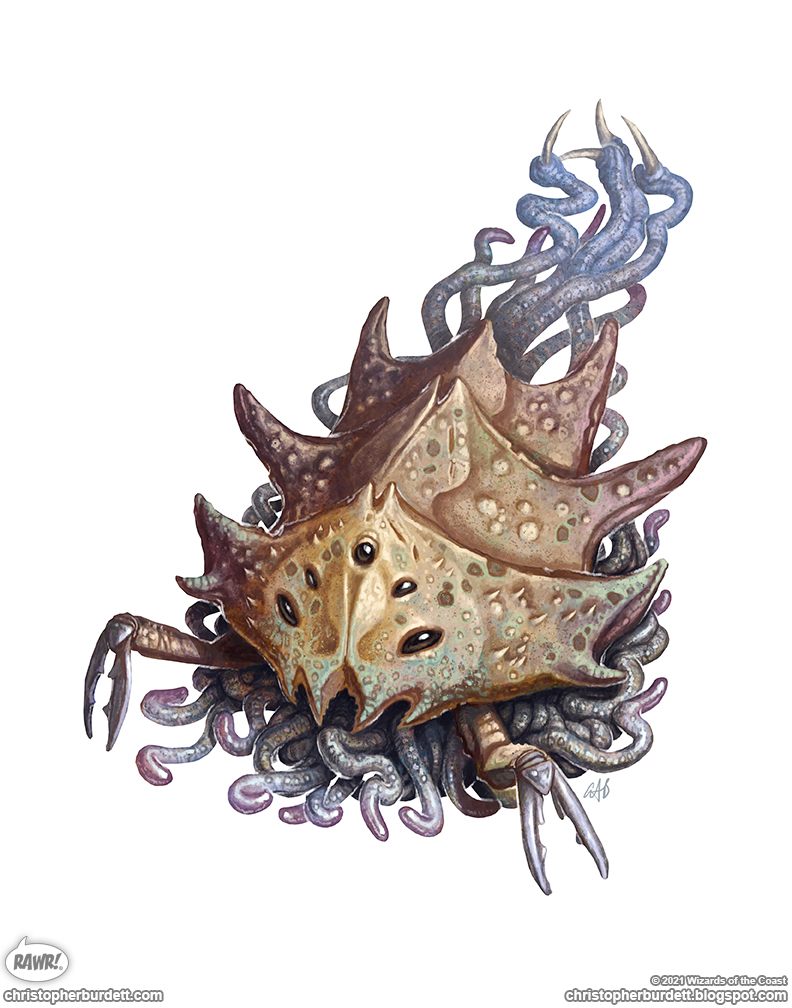
As I shared last time, I was heavily involved with designing the Creature for Dead Birds. The Creature's design would be seen throughout most other effects in the movie, and locking it down was key. Once I had completed my contributions to the design, the shop's art director finalized it, and it went into production in the shop. It was a multiphased process with many working together to get all the work done. Since it was a fully articulated animatronic creature, it needed to perform on set as it was necessary to. This meant that the Creature's body was a hollow fiberglass shell full of control wires surrounded by a silicon skin. Starting things off, a maquette was created to get production's approval, to work it out in the round, and to have a guide as the sculptors moved forward in the full-sized Creature.

The Creature maquette was about six inches long if I remember correctly - give or take. I was involved with several camera and lighting experiments to see what effects were possible with the monster.

 
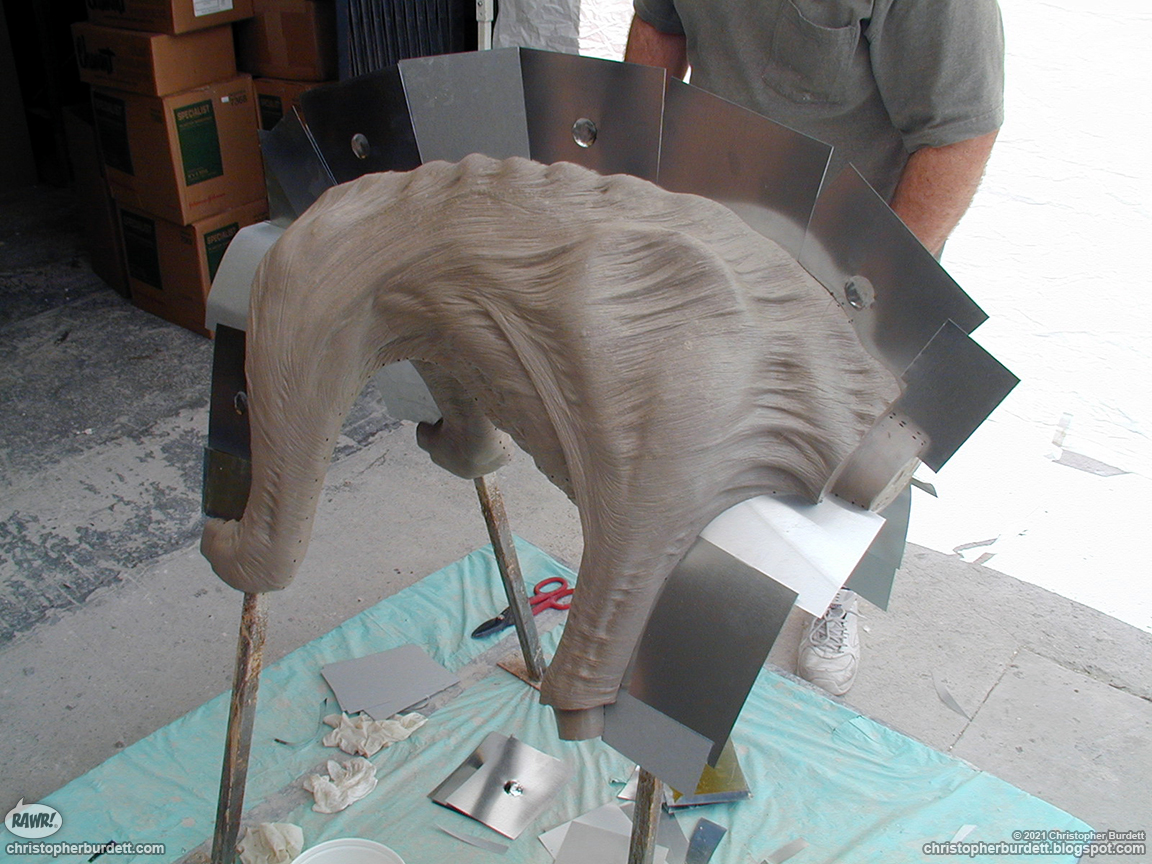
The full-size Creature sculpture is underway. The size was worked out, and an armature was created to support the clay sculpture. The sculpture started very rough and was refined through multiple passes on increasing detail.
 
 
Another look at the entire sculpture. It is getting close to completion at this point, or should I say the body is getting close to completion.
 
 
The head and limbs were removed so that additional refinement and detail could be added to the sculpture. While that was happening, the body was prepped for a fiberglass mold. As with painting, extra detail is usually put into the faces and hands of sculptures, even a monster sculpture.
 
 
This is one of the forelimbs getting additional attention and detail. As a general rule, much of the time, attention, detail, and work that goes into makeup effects and monsters are never seen on screen. It is lost to the process of making movies. The time and work are still put into our creations because the people who paid for it will be on set looking at our creations, and they need to be wowed.
 
 
As with the limbs, the head received more detailing. It also needed to be modified to have an open mouth that could move and display rows of needle teeth.
 
 
The body's mold had silicone injected under pressure to ensure that it was filled and there were no air pockets. Small holes were drilled in the highest points to allow air to escape, and once silicon began to ooze from the holes, they were sealed. If you look at the image's background, you can see the controlled chaos that is a makeup effects shop.
 
 
The body is fresh from the mold. Lots of flashing to clean up and some areas to address, but a successful run. I am not sure who, whom, or why, but in the decision-making process, it was determined that the Creature would have "unsettling" genitalia. It was a popular thing to do at the time, but I never understood it and the glee some took in it seemed very juvenile.
 
 
The limbs were all cast separately but didn't require the silicone to be injected. This back foot appears to have a lot of flashing to deal with.
 
 
This is the fiberglass shell of the Creature taking shape. A great deal of time and effort goes into this type of operation and it was all outside my pay grade at the time. It was all controlled with wires and was completely hand-controlled, with no servos or electronics. 
 
 
As mentioned before, a mouth full of needle teeth could be slid into position to make the monster more fierce.
 
 
The body skin was tired on the shell to see how it all fit. One of the main issues with this monster is that the silicon is heavy. The shell needs to support it, and the wires need to be strong enough to move the shell and the skin. Slashes and cuts were made on the inside of the skin to allow for more movement and flexibility.
 
 
The shell and mechanics are getting close to completion. There is no going back now.

 
The body, head, and limps are all attached to the shell, and the painstaking process of hiding all of the seams begins. Silicon paste is used to conceal the gaps and seams to make the skin a unified form. At this point as well, the mechanics are permanently sealed into the monster. If something goes wrong, the skin will have to be cut open to address any malfunctions. It all has to be perfect, or nothing will work.
 
 
With pain finally going onto the Creature, it is finally beginning to look like a fully-realized monster. We had to use silicon-based paint so that it would stick to the silicon skin. Not the healthiest materials to work with - much like many of the products used in the effect business of the time. Hopefully, safer and more environmentally friendly options are now available.

 
Did I mention we made a full-sized dead Creature?
 
 
This dead version has a silicon skin, but is filled with foam over a wire armature so that it could be posistioned into a suitable pose.
 
 
Slathered with blood and kept almost entirely off-screen, this dead Creature was more for the actors to respond to than to show to the audience. That said, as much time and effort was given to it as was given to all of the rest of the effects created for the movie.
 
 
A closeup of the mouth and needle teeth. RAWR! It is a scary Creature!
 
 
The results of everyone's labors. One fully animatronic monster ready for filming.
 
 
A side view of the monster and that hand rib action that I was so proud of in the design phase.
 
 
A look at the cart the monster was attached to for filming. Kept off-camera, the card allows the Creature a great deal of mobility.
 
 
This is a look at the Creature's back and all the hairs ( that are TOTALLY not fishing line) that cover its body.
 
 
One final shot of the Creature head-on.

Dead Birds

The movie's namesake does make an appearance. We were tasked to design and create several mutated dead birds. I was not involved with any of this particular effect. The shop's art director designed it, and others did the sculpting, paintwork, and finish. Well, I may have seamed one or two and may have painted the background birds; I really don't remember. There were several of these made, but there were one or two hero pieces that were made of silicon and were used for close-up shots. I really like these pieces, and I thought they turned out really well.

 
The sculpture of the dead bird. Only one was made, and the cast birds were modified and changed to appear like there were many different birds.
 
 
The finished dead bird in all its squishy goodness. If I remember correctly, there were some issues with getting the feathers to stick and to look good. There was some back and forth about how much skin should be showing and how much the feathers covered. This hero bird rides the line well.

Ghost Children

There were two ghost children created for Dead Birds. I was responsible for designing the male child, and the art director designed the female child. Both went through minimal design phases and were quick turnaround effects. The male ghost ended up being a mask, and the female ghost was a multipiece makeup. Working with kids can sometimes be difficult, and getting life casts of children can be a terrifying ordeal for both child and adult. But to make film quality masks and makeups there weren't alternatives at the time. You might notice some similarities of these masks and makeup to the look of the Creature.

 
The sculpture of the male ghost mask. It is very true to the design and very creepy.
 
 
The mask was cast in silicon and was painted in the same fashion as the Creature.
 
 
The finished male ghost mask.
 
 
The female ghost was similar but a little different, almost like an earlier form. This is the sculpture of the facepiece for the makeup.
 
 
There was also a next appliance that was sculpted and used. 
 
 
This is the foam latex face appliance for the female ghost. I know this is definitely not my work. I never went in and used white paint in my work as it is used here.

Clyde Scarecrow

Clyde, played by Michael Shannon, needed to have a multipiece makeup created and a replica head. This meant a lifecast was required. I designed all of the aspects of this effect, but a lot of the finer details were worked out in clay. I was uncertain of my efforts for this piece at the time. Looking back at the end results now I think it was a successful finished effect.

 
Michael Shannon going under the blue goo.
 
 
The sculpture for the facepiece of the makeup. The thread was added so that when the sculpture was review it was clear what it would look like. The thread was not part of the sculpture and was added to the finished painted makeup.
 
 
If I remember correctly, the chest piece was sculpted off a generic form we had available.
 
 
The raw foam latex cast of the chest piece.
 
 
The foam latex face appliance after it was painted and the thread was added.
 
 
The fully-painted chest piece.
 
 
Finally, the replica head of Clyde ready for use on set. We took a cast from his lifecast, modified the head position, added a cast of the face appliance, and painted and finished it so that it would match the makeup on the actor.

There are so many more images that I have in my archive. So many more memories and stories. I will end here, though. If you have questions, I am happy to answer them. This was but one of the many projects I worked on in my time in LA and if the mood strikes me I will bring more to the blog in the future.

That's all for another exciting Wednesday on the blog. See you back here on Friday! Until then...

For more samples of my work or to contact me regarding my availability, head over to my website: www.christopherburdett.com