Showing posts with label Photoshop. Show all posts

Friday, December 13, 2013

And now for something completely different...

From time to time I find it interesting to compare and contrast my monster work and my other work. My other work refers to my day job as a graphic designer and maker of pretty pictures. If you ever wondered what I did during the day before I am making monsters all night... well, here you go...


These are all from an app aimed at middle school students and I did these at the beginning of the year. The students take samples of the water and looking at different conditions in the environment. There are five different locations that the students will take samples from and they very from wilderness to farm lands to urban areas...


By the end you can see things are not looking good for the little fishes. These were all based on aerial images of an actual river in central Florida. I took a lot of pleasure in thinking of this as an updated version of River Raid. I sometimes really wish more things like this came my way... but when they do, they are really fun. There was also a cross-section that had several different variations that explained different actions with water and the environment... like evaporation...


These are all just a little different from a tentacled monster. Takes all kinds... These are all copyrighted by a bunch of people... but I am not sure all who, so please play nice and don't take them.

That is all for another exciting week on the blog, see you back here on Monday! Until then...

For more samples of my work or to contact me regarding my availability head over to my website: www.christopherburdett.com

Friday, May 10, 2013

Question from the blog: Under paintng and under drawing settings

Recently received a question on the blog and I had the opportunity to answer it sooner rather then later. William asks...

"What method (how do you) set up your line drawing so that you can color "under" it, coloring so that the lines are not covered up, if that makes any sense. I see underdrawings used all the time by artist in Imagine FX, but NO ONE describes what settings, masks, layers whatever they do so that they are not painting completely over the image."
First things first...

I STRONGLY STRESS THAT EACH ARTIST FINDS THEIR OWN PATH AND WHAT METHODS WORKS BEST FOR THEM. Simply coping what I do will not necessarily produce the same end product and might not be a good fit for everyone. Trial and error and finding out what works for you and the way you work is the best way to build your skills and abilities. Understanding WHY these setting work and what you can do with them is as important as any other tool and technique in your arsenal. 

With that said, let's get started!

Over the years I have employed various techniques to build up my paintings... with a wide variety of levels of success. Up until a year ago, I fine-tuned a method that was working reasonably well for me. A year ago I was shown how to do it better. Over the last year I have customized this newer process and it is what I use for all my paintings now. I will be showing a side by side comparison of my file hierarchy and settings. But first, lets start with the drawing.

The drawing is very important to my painting process and carries a lot of the weight of my work. I spend a lot of time working out the drawing to insure I have the best starting point. Parts of the drawing are still visible in all my final paintings, but if I have done my job correctly, you will never know it. I have established a process over the years that I apply to all my drawings to get them ready for paint. I have a handy info graphic that walks you through it...

Drawing filtering process.

Now that the drawing is ready I can begin to paint. Again, I have a info graphic that breaks down my paintings and explains each layer. The older process is a lot more straightforward, but requires a lot more work to control color and value - I did learn a lot by using this method and I strongly stress that figuring out the hard way to do something make everything else much easier and more rewarding. My current process allows me to better control value and color and has really sped up my work time. Of course, I don't know how much this speed increase is due to a better understanding of what I am doing versus a change in process. Let's have a look at the breakdown of my files...

 On the left, my old process. On the right, my current process.
The drawing is clearly visible until steps 3 / 6 

With my current process the drawing is completely visible until I begin actively painting with opaque marks at step 6. Unlike my old technique, steps 2 - 5 and building on the drawing and incorporating it more into the under painting. Instead of just a multiply layer of color over the drawing making everything darker with my current build up the drawing begins to take on color and affect what the color and value is doing. This can be seen best here...

 The drawing lives on until you need it to go away...

The layers and settings in the second info graphic should give you more then enough to start moving in the better direction. Simply a multiply layer over the drawing is enough to get you started. Finding out what works for you is the hard part. I went through a lot of trail and error over the years while I figured out what works best for me. Of course... some of that trial and error involved me getting better at what I was doing which required to find better ways to use my tools. Here is another look at the files and layers. The highlighted layer is at which point I began painting opaquely and started covering up the drawing...

Old process layer structure.

Current process later structure.

As you can see, both have about the same number of layers. My current process have more emphasis on the earlier stages of building up the under painting and establishing the value and color. My old process got quicker to the actual painting but then required more layers to adjust what was painted. I like the current version since it allows me a more fleshed out starting point. A stronger beginning allows for a stronger over all piece... IMHO.

I hope this helps, William! If yo have any other questions or needs clarification, just let me know!

That is all for another exciting week on the blog, see you back here on Monday! Until then...

For more samples of my work or to contact me regarding my availability head over to my website: www.christopherburdett.com

Wednesday, July 11, 2012

Trobriand's Machinations - Process

Today I have for you another look at my process that went into creating a recent D&D piece. This time around we are looking at the Scaladars for the Trobriand's Machinations article in Dungeon magazine #201.

As mentioned last week I figured I better go ahead and share my remaining process posts before August rolls around when I will be able to share my updated process for working up the under painting. You can always find more detailed explanation of my process on the blog HERE, HERE, and HERE.

As always when working on an illustration with a new creature I have to design I will do several roughs of the creature and several thumbnails of my composition for the illustration. With this Scaladar piece I had to design two new creatures and put them both in a narrow vertical composition. Luckily for me one of them is flying which makes composing them a lot easier. Since space was always a concern I had the composition in mind during the design process for these two mechanical scorpions...

Scaladars - Designs
© 2012 Wizards of the Coast

Scaladars - Thumbnails
© 2012 Wizards of the Coast

When these were all said and done I was leaning toward thumbnail "A" which had Shadowclaw Scaladar "A" and Winged Scaladar "B" in it. When feedback came back to me they concurred with my thoughts on thumbnail "A" but wanted the more naturalistic cavern interior for the background that is in "B".  I could totally get behind that decision, with pencil in hand I moved onto the more fleshed out drawing...

Scaladars - Drawing
© 2012 Wizards of the Coast

This piece depicts two new Scaladars, which are large scorpion like constructs created by a mad wizard (all the best stuff is created by mad wizards). One of the new Scaladar was a straight forward flying variety the second, the Shadowclaw, was infused with powers of the Shadowfell and had claws made of shadow like substance. Those shadow claws were my biggest concern with the entire piece. Dark cave + Scaladar made of black metal + claws made of shadows = my brain hurting to make sure it all reads and is clear. I sometimes feel I illustrate a lot of black creatures in black environments... while trying not to make either black. I got to work on the painting and hoped that it did not get out of control on me...

Scaladars - process
© 2012 Wizards of the Coast

And in eight easy steps it is all done... not really... This one took a bit of work and as easy as the Doom Hulk was this one was tough. As I feared those shadow claws gave me fits, but in the end I got them to work out. I had a good track record of late with final paintings until I got to this piece, I actually had to tweak it a tad after turning it in as per some notes from my art director. They were quick for the most part and really pulled the piece together. You can see what I changed in the final tweak in the last step of the above image. A lot of rim lighting going on with multiple light sources... I wonder if I am doing too much of this lately... who knows, but it is sure fun!

Here is the final piece in all its glory and your players now have some new lower level mechanical terrors to deal with...

Scaladars
© 2012 Wizards of the Coast

That is all for another exciting Wednesday on the blog, see you back here on Friday! Until then...

For more samples of my work or to contact me regarding my availability head over to my website: www.christopherburdett.com

Monday, July 2, 2012

Far Realm Fiends - Process

Today I have for you another look at my process that went into creating a recent D&D piece. This time around we are looking at the Doom Hulk and Geometric Impossibility for the Far Realm Fiends article in Dungeon magazine #201.

I figured I better go ahead and share my remaining process posts before August rolls around when I will be able to share my updated process for working up the under painting. If you are familiar at all with my blog and my process posts this should all be pretty straight forward. You can always find more detailed explanation of my process on the blog HERE, HERE, and HERE. As always when working on an illustration with a new creature I have to design I will do several roughs of the creature and several thumbnails of my composition for the illustration...


  Doom Hulk - Roughs
© 2012 Wizards of the Coast

Doom Hulk and Geometric Impossibility - Thumbnails
© 2012 Wizards of the Coast

I was really leaning towards "A" on all accounts and when the feedback came back to me everyone at WoTC was in agreement with me. This is always a huge relief that I am on the same wavelength as my art director and the designers. They don't always go with the ones I hope they well, but all of the roughs and thumbnails are fine with me. NEVER submit anything you do not want to draw and paint, art karma will bite you and the one you didn't want picked will of course be the one picked.

Now that the rough and thumbnail are approved it is time to move forward on the final drawing and get everything fleshed out... 

 Doom Hulk and Geometric Impossibility - Drawing
© 2012 Wizards of the Coast

The Doom Hulk was described as a massive nightmare brute. It takes on the form of your worse nightmare and proceeds to smash you to death. In its normal form it is said to be a massive humanoid form constructed of black ropey cords.Whatever it is, it is big, brutish, and wants to hit you in the face... a lot. I have a soft spot for this type of monster... as I have mentioned countless times before. The Geometric Impossibility was described as a hallway where the laws of physics have broken down and perspective and normal spacial understanding is gone. That kind of stuff is always fun, you can never be wrong! Now that the drawing was all done and approved it was time to get to painting...

Doom Hulk and Geometric Impossibility - Process
© 2012 Wizards of the Coast

And in six easy steps you have a finished painting... or not... This one came together really fast. I knew what I wanted to do with it when I was working on the thumbnails so a lot of the decisions were taken care of early on. This piece was also about proving something to myself. At some later date I might share more details, but I flubbed on some important work earlier in my career and one of the pieces was similar to this one. It meant a lot to be able to jump into this piece and take care of it without any stress or problems. Always trying to make things right that once went wrong... I am quantum leaping through my own art career... or not...

Here is the final piece in all its glory and your players now have a new terror to look out for at higher levels...

Doom Hulk and Geometric Impossibility
© 2012 Wizards of the Coast

That is all for another exciting Monday on the blog, see you back here on Wednesday! Until then...

For more samples of my work or to contact me regarding my availability head over to my website: www.christopherburdett.com

Wednesday, May 16, 2012

Darktentacles - Process

I have for you today the thrid of the process posts for the recent work that I produced for the Halls of Undermountain. Today we wrap things up with the Darktentacles!

Thumbnails started things off as always. This time around there was not a lot to draw from immediately for reference, the big balls of tentacles usually come out of my head and that is were these manifested from. The Darktentacles was described as possibly lifting itself out of the water with a few if its tentacles. The tentacle are black and studded with eyes. There is not visible head, it is simply a mass of horrific tentacle goodness.  I can do that! The goal of the thumbnails was to come up with a pleasing mass that showed movement and allowed for a good reveal of the creature. I was on the fence on all of these and did not have a preferred choice, I would leave that up to production. In the end, "B" was the lucky winner...
 
 Darktentacles - Thumbnails
© 2012 Wizards of the Coast

There was one request, they wanted to see an element added to show the scale of the Darktentacles. Cave fish were suggested and I worked up a couple quick comps showing some options for some cave fish joining the party. This time around, "C" was the winner...

  Darktentacles - Revised Thumbnail
© 2012 Wizards of the Coast

Now it was time for the drawing. This was again one of those situations were once I was well into the drawing I pause and thinks, 'man, that is a lot of tentacles and eyes I now have to paint...' This is said mostly in jest, I do not mind working of complex forms with lots of detail, it just takes time and I need to approach the piece in such a way that I do not focus on all that detail too soon. I need to deal with the over all form first and make sure all the ground work is there before I go nuts with all the fine details. I left the background purposefully vague and empty. I planned on making sure there was cave interior back there but that was all going to come together in the painting stage once I see how the creature was coming together. The drawing was completed, turned in, and approved...

 Darktentacles - Drawing
© 2012 Wizards of the Coast

Now it is time to for the bulk hard work, the painting. Nothing has changed from my usual progression. Manipulated drawing, under painting, main paint level, adjustment and fix layers. You can see more detailed break downs of all this HERE, HERE, and HERE.

I mentioned earlier that I didn't shoot any reference for this piece since it was a ball of tentacles, I did of course use a lot of gathered images for reference in the painting stage. Cave interiors, animals with slimy dark skin, rock and water images were all used to make sure my decisions were all influenced by the world around us. Even when something is completely alien to the world, just a little real world added in will make it that much more believable. This piece did go very quickly and just like magic the images appeared before my unbelieving eyes...

 Darktentacles - Painting progression
© 2012 Wizards of the Coast

This piece has several elements that have appeared in other pieces that I have created in the last couple of years... dark cave, water, dark creature. I have been working to better envision these elements together... the black creature in the black water in the black cave... just use the paint bucket to cover the canvas in black and turn it in. I kid of course. The challenge for me has been to create a scene that on paper is completely black and to give it light and color while still making sure it feels like it is in a deep dark place. This is probably one of my better attempts at it. It gets to the point where if I think too much about it I will make it worse, so I just let myself go, have some fun and make sure the image as a whole is working...

Darktentacles
© 2012 Wizards of the Coast

This is the last of my pieces from the Halls of Undermountain adventure book. I still have two more recent D&D pieces that I have process information to share with you in the coming weeks.

That's all for another exciting Wednesday on the blog, see you back here on Friday! Until then...

For more samples of my work or to contact me regarding my availability head over to my website: www.christopherburdett.com

Monday, May 7, 2012

Snake Curse - Process

I have for you today the second of the process posts for the recent work that I produced for the Halls of Undermountain. Today we turn up the gross factor with the dreaded Snake Curse!

Thumbnails started things off as always. Well... I should say reference photos really started things off, but we will get to those in a moment. Once I had a feel for the physicality of the scene in my head and in photos I got to work on some thumbnails fleshing out my ideas. The piece is really about the exploding dwarf, but I wanted to be a little more involved then just a medium shot with the dwarf spilling all over the place. I thought having a foreground and background figure could allow some nice overlap as well as place the dwarf more within a space. After playing with the elements and options I had a really good feeling about 'C', and once submitted, 'C' was the winner...

Snake Curse - Thumbnails
© 2012 Wizards of the Coast

Now it was time for the drawing. This piece is all about snakes, and I knew I wanted to have a LOT of them. When I think about snakes I think about scales and when I think about a lot of snakes I grit my teeth and accept there will be lots of scales. This is when a fully fleshed out drawing can really help out. More and more I am realizing just how integrated my drawings are in my final painting. The details and work I am putting into my drawings are as important to my paintings as is the actual paint work I do later in the process. I can leave the details as they are, paint over them, or emphasis them as needed. I have it before and I will say it again, the more time and effort I put into taking reference, working out the thumbnails and fleshing out the drawing the quicker and easier the painting is for me. The drawing was completed, turned in, and approved...

Snake Curse - Drawing
© 2012 Wizards of the Coast

Let's jump back and have a look at some of the reference. More silly pictures of me acting out the scene. I am NOT posting the dwarf pictures... I have to have some secrets, and they were just a little too over the top for me to comfortably share on the internet. I did end up piecing together three separate photos to make the final dwarf reference. The upper body, lower body and left arm were all from different photos but provided me with the pose I really wanted for the piece. The other two figures were a lot more straightforward. There was a second pose for the rear figure I also really liked, but this one was the final winner...

Props, costumes, and correct lighting all help inform the reference which then better informs the painting. Everything works together to help me understand how different materials and forms will be affected by the scenes lighting.

Now it is time to for the bulk hard work, the painting. Nothing has changed from my usual progression. Manipulated drawing, under painting, main paint level, adjustment and fix layers. You can see more detailed break downs of all this HERE, HERE, and HERE. Though the differences in some of the later steps might seem hard to distinguish, there is a lot going on to the over all brightness, contrast, and detail level of the piece. Just like magic the images appears before my unbelieving eyes...

Snake Curse - Painting progression
© 2012 Wizards of the Coast

As will all my work I try to manage my time to allow me to finish the piece well before the deadline so that I can put it aside for a few days. This allows me the chance to see it again with fresh eyes and get a better look at for mistakes and areas that need to be adjusted. This use to allow me to catch some pretty big errors sometimes, but as years tick by thankfully the bigger issues are resolved long before the painting stage. Mostly these days the fresh look allows me to catch little things and to make adjustments that help the overall piece. Remember to 'kill your darlings' and if it is not working, fix it. It does not matter how long you worked on it, if it is wrong, it is wrong, make it right. And try to have some fun...

Snake Curse
© 2012 Wizards of the Coast

For the record, I am very much aware that a snake either opens its mouth or sticks out its tongue, but it does not do both at the same time. If this does in fact happen in one of my paintings, this was done purposefully for my own reasons.

That is all for another exciting Monday on the blog, see you back here on Wednesday! Until then...

For more samples of my work or to contact me regarding my availability head over to my website: www.christopherburdett.com

Wednesday, April 25, 2012

Wroot the Goblin - Process

I have for you today the first of the process posts for the recent work that I produced for the Halls of Undermountain. Starting things off is Wroot the Goblin!

This piece actually has is a really personal piece for me, and not just because of the silly reference photo you will find below. I followed the art order completely and for all purposes this goblin will forever be known as Wroot, for me and a handful of others, this is in fact Splug. Splug appears in the very first adventure module for 4th edition, Keep on the Shadowfell, and is a little NPC that could be played at the Dungeon Master's prerogative. Splug became fast friends with my players and he has joined in the adventure since and even now is still a faithful follower and a source for comedy. I had an image of what Splug looked like in my mind and when I read the art order for Wroot, I knew that I had an opportunity to make a painting of Splug, and I was very excited about getting started on this piece in particular.

Starting things off I did my roughs to get a feel for the character, gear and other props. The clear winner for me, and with my art director (though she liked them all) was option 'C'. I just needed to come back with some leg options, she felt ending him at a clean line of his clothing might make it feel as if he was a disembodied undead creature. A couple more updated roughs with legs and 'C' was the winner again...

 Wroot the Goblin - Thumbnails
© 2012 Wizards of the Coast

Wroot the Goblin - Updated thumbnails
© 2012 Wizards of the Coast

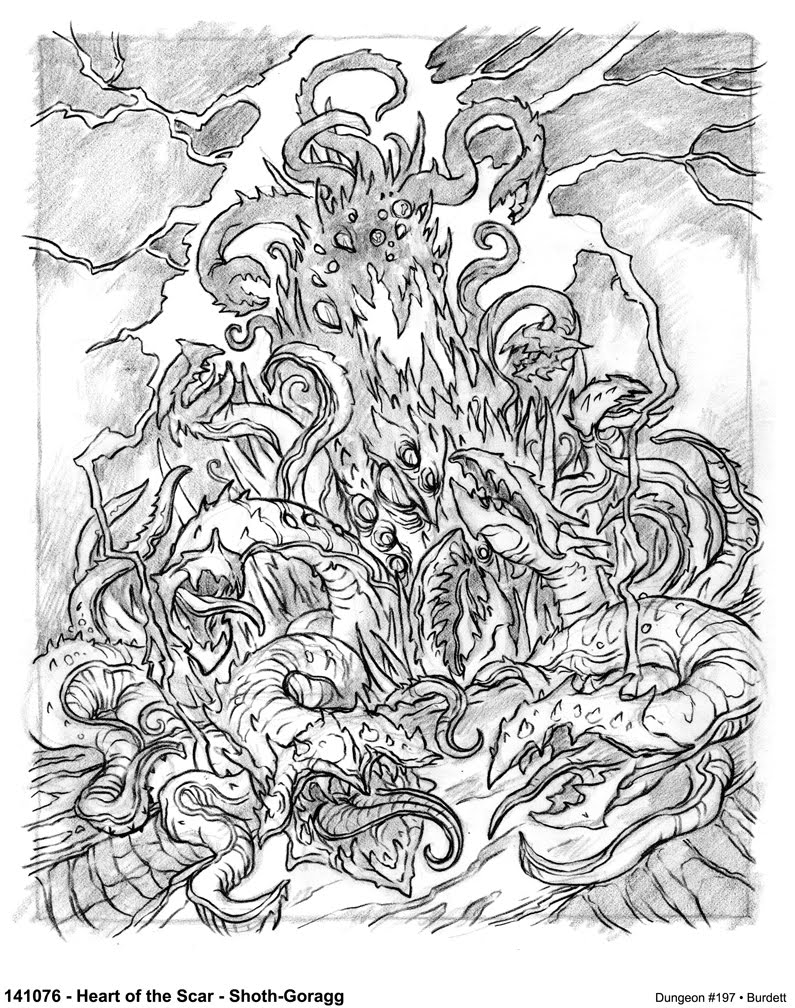
Once the thumbnail was approved I moved forward on the final drawing. I have said it a million times here on the blog and I will say it once more, the drawing is most likely the favorite part of the process for me and I really have to hold myself back to not get carried away and spend too much time on it. It is also the point of the process I suddenly look down at the drawing and think to myself, "Great, I now have to paint ALL those wrinkle, scales, horns, tentacles, etc... boy am I glad I showed no restraint in putting in as many as I could."
 
  
 Wroot the Goblin - Drawing
© 2012 Wizards of the Coast

This step is a little out of place, but I didn't want it to be the first image on the post! Before I start any piece I shoot reference. I make some very loose personal thumbnails to keep my thoughts together or at least talk through all my options with my wife who does all my camera work for me. I then the photos of all ideas, her ideas, and lots of happy accident to then more inform and direct the subsequent steps in the process. Sometimes I nail the idea I had perfectly with a photo we take, sometimes a much better direction is discovered once I see the photos. But in the end, physically getting into the mid set of the subject matter, with the props, the pose, the silly faces just really gets me more invested and involved with the piece and helps me get my head around what I am about to take on. This is the reference for the pose that was selected, it is actually a combination of two different photos taking the best elements to make the desired pose and prop combination...

Silly silly photo of me as yet another monster.
Points of interest: the red bag hanging off the backpack is my dice bag I use to play D&D; the two metal water bottles in front have been in SO many photo shots and subsequently have made in into the gear that a lot of my monsters carry; my first couple attempts of getting all this gear together and work as a backpack failed, so my wife had to tie everything onto the backpack and me as I stood there to get the shots we wanted to get. RAWR!

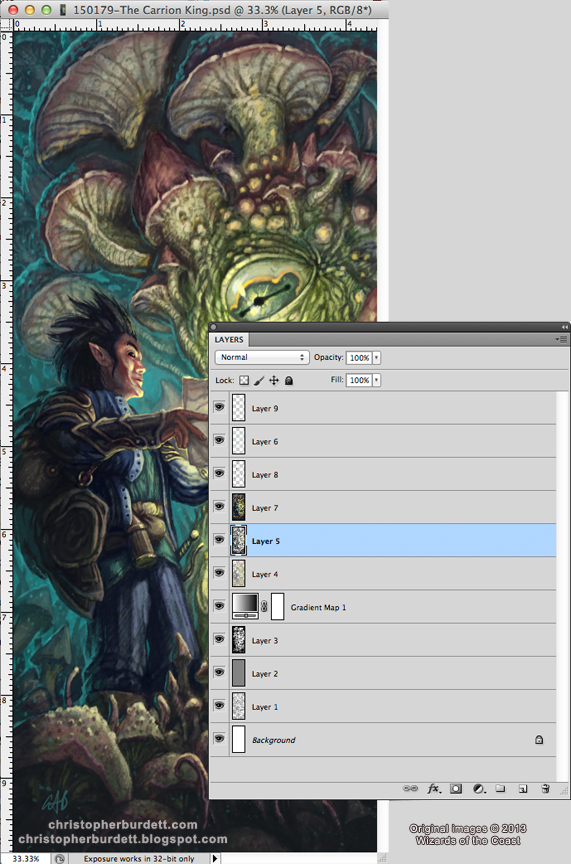
Back to the Goblin... Now that there was an approved drawing it was time to get painting. I continue to use the same basic process I have been using to paint for the last several years, you can find other more detailed explanation of this on the blog (like HERE, HERE, and HERE). Basically, I start with my manipulated drawing as the first layer, then a multiply under painting layer, then a standard layer where I do all my actual opaque painting, and finally there are a handful of layers used to make fixes, adjust areas, and do universal adjustments to lighting, contrast, or brightness. The bulk of the work is done with a layer 3, but without the time I put into the drawing and under painting layer the image would not exist. I have found as I continue using and refining this process that the more time I put into the drawing and the under painting the easier, quicker and less I have to do with the actual painting layer. Imagine that, a good foundation and planning makes the following steps easier...

 Wroot the Goblin - Painting progression
© 2012 Wizards of the Coast

And then, suddenly, like make there is a finished painting. Well, after many hours of work and many planned out steps and processes there is a finished painting. I continue to use the reference trough the entire process just to make sure I don't miss any subtle real world element that will add that little bit of extra reality...

Wroot the Goblin
© 2012 Wizards of the Coast

 That is all for another exciting Wednesday on the blog, see you back here on Friday! Until then...

For more samples of my work or to contact me regarding my availability head over to my website: www.christopherburdett.com

Wednesday, December 21, 2011

Heart of the Scar - Process

As promised when I first showed of the Heart of the Scar I have for you today a look at the steps that went into the piece. Over the last couple of years I have been able to put together a work flow that has been very successful for me. The work flow plays to my strengths and insures that I am aware and address my weaknesses. If you saw my recent post on the process for the Oasis Beast, then this work flow should look very familiar. Since I was creating a brand new creature and illustrating it I started with some concepts for the creature and thumbnails for the over all illustration. As you will see, I had a fairly set idea of what I wanted to do for the illustration...

Shoth-Goragg Concepts
© 2011 Wizards of the Coast
Option 'B' was my first choice but 'C' was the winner in the end.

Heart of the Scar thumbnails
© 2011 Wizards of the Coast
Not sure if any of these were a stand out favorite of mine. I just knew I wanted to get up close and personal with the monster so you could see all the tentacles and horror. Option 'C' was the winner with production.

Now that I had a monster and a composition I could get started on a final drawing. Looking at the drawing now I am a little shocked how little detail I put into it, especially with it being such a large and prominent piece. I guess I felt confident in the subject matter and forms that I didn't need any thing more complex from the drawing. Of course, it tuned out I was correct... thankfully!

Heart of the Scar drawing
© 2011 Wizards of the Coast
Need to kill you player's characters? I got something for you...

I was working on this piece and the Oasis Beast at the same time. I have a superstition that makes me work on paintings in the order I was assigned them, since the Oasis Beast was first on the list I finished it first followed by the Heart of the Scar. I usually prefer to work on larger more complex paintings first, but my silly superstition wouldn't allow it. When I did get started on the painting I was a little surprised with how quickly it went...

Heart of the Scar painting progression
© 2011 Wizards of the Coast

After an undetermined amount of time I had a finished monster ready to devour unsuspecting players. As I have mentioned previously, I really need to keep track of how much time goes into a painting one of these days. As per my work flow, I put the piece away for a few days to have a look at it with fresh eyes, made some changes and turned it in with my fingers crossed that I had not taken stupid pills when working on it. Thankfully I had not and the piece was approved without revisions!

Heart of the Scar - Shoth-Goragg
© 2011 Wizards of the Coast

This piece is my first cover and to make it even better it is for Dungeons and Dragons. I could not be happier and it was a real treat to work on! To wrap up the post, here is the piece on the cover...

Dungeon Issue #197

Another monster to add to the monster zoo in my head. If you have any questions regarding the steps I take or the process in which I work, please feel free to ask!

That is all for another exciting Wednesday on the blog, see you back here on Friday for some tentacled holiday cheer! Until then...

For more samples of my work or to contact
me regarding my availability head over to my website: www.christopherburdett.com

Monday, December 5, 2011

Heart of the Scar - Dungeon Issue #197

Dungeon magazine issue #197 is out and I am on the cover! This is my first cover and I can not be happier that it is for Dungeons and Dragons. The piece depicts the harrowing finale of the Chaos Scar adventure, Heart of the Scar. I was tasked with designing and illustrating a horror from beyond time and space, a terrifying mass of tentacles and eyes, and if there is one thing I feel confident about, it is tentacles! On with the monster...

Heart of the Scar - Shoth-Goragg
© 2011 Wizards of the Coast

I was working on this piece at the same time I was working on the Oasis Beast. Back to back design and illustration of new D&D monsters, I was not complaining! This is one of those surreal moments when reading the art order that I realize that all my hard work to convey to my clients the type of work I want to make has paid off. You need a tentacled horror from beyond time and space surrounded by a hole in the very fabric of reality? Yeah, I got you covered! There is always a certain amount of worry and/or stress that goes into any of my paintings as I plan it out and take it from the under painting to the finished piece making sure I don't miss anything. With this painting there was none of that stress and worry and that was pretty special. This is how the piece looks on the cover...

Dungeon Issue #197

In the near future I will bring you some of the process work that went into making this piece. Again, a huge thanks to Kate Irwin for getting me involved with this assignment! It was right up my alley and I had a ton of fun!

That is all for another exciting Monday on the blog, see you on Wednesday! Until then...

For more samples of my work or to contact
me regarding my availability head over to my website: www.christopherburdett.com

Wednesday, November 16, 2011

Terrors of the Silt Sea - Process

Before I left for Illuxcon I shared with you the Oasis Beast that I did for the Dungeon Magazine article, Terrors of the Silt Sea. I promised that I would share with you some of the work that went into this piece once I was back and settled and that day has come! I was working on the Oasis Beast and another D&D piece at the same time and both required me to design a brand new monster and compose it in an illustration. To save time with feedback and approvals I went ahead and did some concept designs and some thumbnail compositions using my favorite concept...

Oasis Beast Concepts
© 2011 Wizards of the Coast
Option 'C' was really talking to me and I had my figures crossed.

Oasis Beast thumbnails
© 2011 Wizards of the Coast
The monster says RAWR!I was on the fence between 'B' and 'C' and so was production. The decision to go with 'C' was made and I moved forward.

I had an overall idea of what I wanted to do with the piece so before I did the thumbnails I went outside in my armor and had the wife take some photos of me reacting to a horrifying monster. I used my three favorite poses for the thumbnails and thankfully my favorite was in the option selected. I moved forward with the final drawing. As I have mentioned innumerable times before, the drawing phase is my favorite part of the whole process. I always wish I had a little more time to spend working up the drawing. Working out issues and fleshing out the design I completed the final drawing and submitted it...

Oasis Beast drawing
© 2011 Wizards of the Coast
The Oasis Beast has all the teeth in Athas. There are now no more teeth for the other monsters to have.

Once approved it is now time to paint! Again, I had previously put some thought into what I wanted to do with the color before beginning so I knew where I wanted to go with the piece. There is always an ebb and flow to a painting and things don't always end up where I thought they would when I begin, but that is usually for the best. Here is a process progression of the painting. One of these days I will be more vigilant to document the 'magic' that happens between image 2 and 3 when it goes from the under painting to a more finished painting. In the meantime...

Oasis Beast painting process progression (HUZZAH! ALLITERATION!)
© 2011 Wizards of the Coast

After a period of time greater then an hour and less then four weeks I finish the painting. I must really keep better notes on the time spent on a painting so I give people a definite number when they ask. In most of my work there is a cool down time I build into my personal deadline so that I can finish the painting and put it away for several days to a week so that I can get a fresh look at it before turning it in. I usually catch little things that need tweaking and sometimes I will catch that big glaring issue I missed earlier because I was too close and too familiar to the piece. Thankfully I seem to hit the nail on the head every step of the way with this piece and when I turned in the final it was approved right away...

Terrors of the Silt Sea: Oasis Beast
© 2011 Wizards of the Coast

Another monster to add to the monster zoo in my head. If you have any questions regarding the steps I take or the process in which I work, please feel free to ask!

That is all for today, see you back here on Friday! Until then...

For more samples of my work or to contact
me regarding my availability head over to my website: www.christopherburdett.com