I would like to repeat something I said over on DeviantArt before we get started... in art the brushes, computers, paints, clay, tablet, paper, pens, or pencils we use are all merely tools. Good tools help us work faster and achieve out goals more easily. There is no one magic brush in Photoshop that will make the perfect painting... believe me, I have searched and searched.
With PS brushes I went through a lot of experimentation over the years. Trial and error is the name of the game until you understand how all the controls in the brush panels work. I would be sitting here writing until next week trying to explain it all and do neither of us any good. Go into PS, pick a brush out and start messing with it, it will be crazy at first but the more you work with it the more you will come to understand the amazing power you have with the brushes.
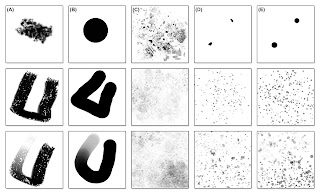
For most of my current paintings I use 4 different brushes, for the Sea Demon's Shrine I used 5 because there was some splashy water. These are the 5 brushes:
 Photoshop brushes.
Top row: 100%, all controls turned off, "single mouse click". Middle row: marks made using the mouse. Bottom row: marks made using stylus on tablet.
BRUSH (A) - I got this from Mark Winters. He offers this brush on his DeviantArt account and I highly recommend you stopping by and getting a copy. I use this brush now to do all my under painting. It is nice and chunky and has loads of texture. (Thanks again Mark!)
BRUSH (B) - Standard issue hard round. This is a stock PS brush with the opacity control set to the pressure of the stylus. I use this brush to do all my heavy lifting when it comes to the painting. This is and will likely always be my main painting brush.
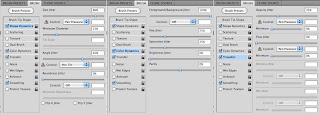
BRUSH (C) - A version of this brush came with a magazine I bought a while back. I didn't really start using it until early last year and after I made some changes to it. I use this brush mostly in my under painting, the color jitter gives me some really nice unexpected color events on the canvas that I then can play off of in the main painting. I also use it to help add texture and reduce the digital feel to the painting. This is the brush I use for the 'overlay layer'.
 Control panels for BRUSH (C)
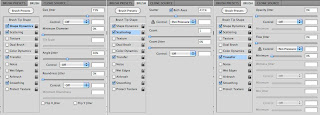
BRUSH (D) - I made this brush when I worked on the Monster Manual 2 and I have been using it in every painting since. Like BRUSH (C) this one is used a lot in the under painting to add texture and then again to help break things up in the main painting. It was REALLY easy to make and incredibly invaluable.
BRUSH (E) - Identical to BRUSH (D) in almost every way save that the marks are circles to help make the splashy water stuff a little more quickly.
I hope added to my two previous post regarding my process helps give you all a much clearer view of how I go about making my work. What I can't show and quickly explain is the time and hard work that also needs to accompany all these steps.
If you have any further questions please feel free to pass them along!
That is all for another week! Monday is a holiday do I will not be posting, but I will be back on Wednesday. Really looking forward to sharing with you a brand new piece on Friday! Can't wait! Until then...
For more samples of my work or to contact me regarding my availability head over to my website: www.christopherburdett.com


Do not encourage people who ask what brushes you use in Photoshop. DO NOT!
ReplyDelete:D
That reminds me... Jon, what brushes do you use in Photoshop? :P
ReplyDeleteAwesome post, Chris. My paintings are always lacking in the texture department.
ReplyDeleteThanks for sharing Chris and the further in depth view of your process. This series of posts is great!
ReplyDelete