Showing posts with label reader question. Show all posts

Friday, May 10, 2013

Question from the blog: Under paintng and under drawing settings

Recently received a question on the blog and I had the opportunity to answer it sooner rather then later. William asks...

"What method (how do you) set up your line drawing so that you can color "under" it, coloring so that the lines are not covered up, if that makes any sense. I see underdrawings used all the time by artist in Imagine FX, but NO ONE describes what settings, masks, layers whatever they do so that they are not painting completely over the image."
First things first...

I STRONGLY STRESS THAT EACH ARTIST FINDS THEIR OWN PATH AND WHAT METHODS WORKS BEST FOR THEM. Simply coping what I do will not necessarily produce the same end product and might not be a good fit for everyone. Trial and error and finding out what works for you and the way you work is the best way to build your skills and abilities. Understanding WHY these setting work and what you can do with them is as important as any other tool and technique in your arsenal. 

With that said, let's get started!

Over the years I have employed various techniques to build up my paintings... with a wide variety of levels of success. Up until a year ago, I fine-tuned a method that was working reasonably well for me. A year ago I was shown how to do it better. Over the last year I have customized this newer process and it is what I use for all my paintings now. I will be showing a side by side comparison of my file hierarchy and settings. But first, lets start with the drawing.

The drawing is very important to my painting process and carries a lot of the weight of my work. I spend a lot of time working out the drawing to insure I have the best starting point. Parts of the drawing are still visible in all my final paintings, but if I have done my job correctly, you will never know it. I have established a process over the years that I apply to all my drawings to get them ready for paint. I have a handy info graphic that walks you through it...

Drawing filtering process.

Now that the drawing is ready I can begin to paint. Again, I have a info graphic that breaks down my paintings and explains each layer. The older process is a lot more straightforward, but requires a lot more work to control color and value - I did learn a lot by using this method and I strongly stress that figuring out the hard way to do something make everything else much easier and more rewarding. My current process allows me to better control value and color and has really sped up my work time. Of course, I don't know how much this speed increase is due to a better understanding of what I am doing versus a change in process. Let's have a look at the breakdown of my files...

 On the left, my old process. On the right, my current process.
The drawing is clearly visible until steps 3 / 6 

With my current process the drawing is completely visible until I begin actively painting with opaque marks at step 6. Unlike my old technique, steps 2 - 5 and building on the drawing and incorporating it more into the under painting. Instead of just a multiply layer of color over the drawing making everything darker with my current build up the drawing begins to take on color and affect what the color and value is doing. This can be seen best here...

 The drawing lives on until you need it to go away...

The layers and settings in the second info graphic should give you more then enough to start moving in the better direction. Simply a multiply layer over the drawing is enough to get you started. Finding out what works for you is the hard part. I went through a lot of trail and error over the years while I figured out what works best for me. Of course... some of that trial and error involved me getting better at what I was doing which required to find better ways to use my tools. Here is another look at the files and layers. The highlighted layer is at which point I began painting opaquely and started covering up the drawing...

Old process layer structure.

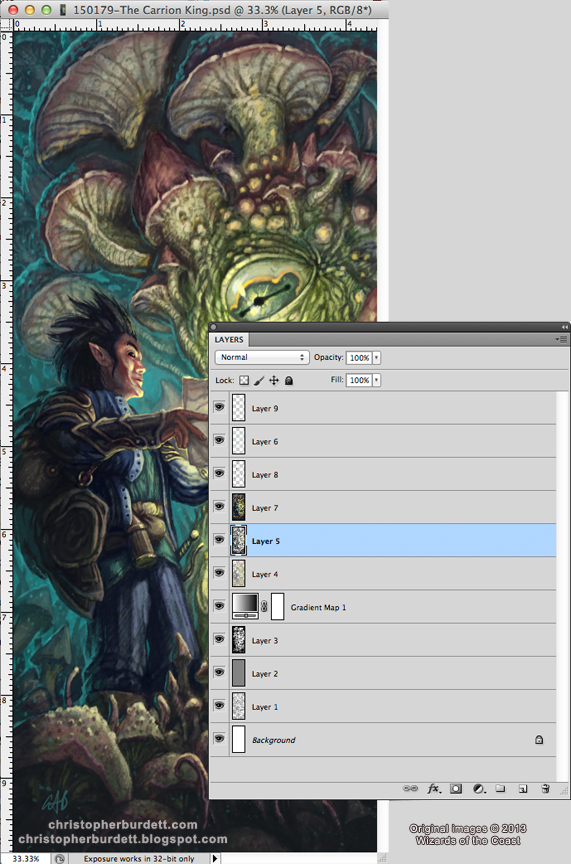
Current process later structure.

As you can see, both have about the same number of layers. My current process have more emphasis on the earlier stages of building up the under painting and establishing the value and color. My old process got quicker to the actual painting but then required more layers to adjust what was painted. I like the current version since it allows me a more fleshed out starting point. A stronger beginning allows for a stronger over all piece... IMHO.

I hope this helps, William! If yo have any other questions or needs clarification, just let me know!

That is all for another exciting week on the blog, see you back here on Monday! Until then...

For more samples of my work or to contact me regarding my availability head over to my website: www.christopherburdett.com

Friday, January 4, 2013

Reader Questions: Emailing clients

A while back I asked readers of this blog to submit questions they would like me to answer about art, working as an artist, or anything else relating to the industry. I received several great questions and it is long over due to start answering them. Today we have a question from Vinter…

Vinter asks:
"I wonder how on earth you send out mails to future clients? I never know how to start a mail… What should I write to not sound full of myself but still come off as someone wist self confidence? And I never feel that I have a strong enough portfolio to ever get work…"
Thanks for the great question and I hope my answer will be helpful. This very topic came up during the lecture Jon Schindehette and I gave at Illuxcon, so I will be able to give my thoughts as well as some of the things Jon touched on. You will be happy to know that less is more and that there is a straight forward answer to your first question on emailing.

This is what you need to include…

• Your NAME
• What you do (I make monsters, concept work, landscapes, tech, etc)
• A LINK to your online portfolio or NO MORE THEN 3 attached samples of your work
• MOST importantly… an OBVIOUS way for the client to CONTACT YOU BACK!

That is it. No epic tale of your love of art, why you are perfect for the job since you have played the game for 20 years, how your mom said you were a good artist… NONE OF THAT. Jon Schindehette says he looks for three things, Name, link, and contact information. PERIOD. You miss any of these and you are sunk. If you include anything more it is just going to be ignored. The extra stuff is great for a face to face review or in a conversation at a convention at some later date. For your first email contact, be straight forward and to the point…

"Hello, my name is… . I make… . Here is a link to my portfolio… . Here is my email address and phone number… ."

You have just emailed an art director in a straight forward and professional way that they themselves have said they prefer. Every art director is going to be a little different and might not mind more, but as long as you give them these key elements you have covered your bases and given them what they need to see if you are right for the job.

EVERY correspondence with a client, no matter if it is one I have worked with for years or if it is the first time talking to them, my email signature includes my name, my email address, my website, my blog, and my phone number. This provides two methods to contact me, the link tomy online portfolio, and a way to see what I am currently up to. My own email that I send out has changed very little over the years but has stayed true to this formula. Earlier on I would include a VERY BRIEF work history, but that has since been removed because my online portfolio has a resume and the work should speak for itself. 

The keys that have launched a 1000 emails...

Now for the tougher stuff…

You are emailing a client looking for work, make sure you are showing the right client the right work. Do your research, make sure the client you are approaching makes work that you want to do and that you make work that they can use. There is no point sending Jon Schindehette your anime or spaceship portfolios. Though he might enjoy seeing the work, he can't use that work for any of the projects he oversees. You make monsters and elves? Send your portfolio to Jon. Want to make Star Wars art? Do your research, find out who produces Star Wars projects these days and send that art director your portfolio and make sure it shows off your ability to paint an X-Wing and a Stormtrooper. Want to do Star Wars and elves and anime? Then you will need to make separate portfolios and send out the right one to the right art director. Art Directors can not afford to take chances, their jobs hinge on the quality of artists that they hire. You might be able to paint a kick ass dragon, but if you show the art director a kick ass Darth Vader they will not assume you can do that dragon. This is all especially true with a new client. After working with the same AD for years and have built up a working relationship you might not have to do all this, but starting out, you have to show the AD just what they need that you can do for them.

As far as feeling that you portfolio is not strong enough… well, welcome to being an artist. Self doubt and being your harshest critic comes with being an artist I am afraid. There are a couple things that can help you, but they do take time and experience. I learned this when working in the film industry in LA and it holds true in the illustration industry… Find the client you want to work for, make sure they make the work you want to do, look at the work they are actively using, and then make work that is as good, or preferably BETTER then the work they are using. It is that easy and that hard. It can be a rather sobering thought, but it is the reality of this industry. But PLEASE, don't let this stand in your way to submit work to clients. There are lots of clients out there and they need a lot of work and they use artists at every stage of their carriers. As far as advancing, the hardest thing to learn is to look at your own work objectively, or as objectively as you can. When you can look at your work objectively you will be able to make the greatest improvements because you can see what really needs to be fixed, improved, or otherwise worked on. This comes from experience, looking at other artist work, and having other artist talk to you about your work. Learning how others see your work will help you see your work for what it is. (I talk about this more and some related topics in my 2012 year in review post!)

I hope this answers all of the questions and addresses all of the topics. If there are any additional questions on this topic or if anyone would like anything explained further, please feel to leave them in the comment section below. Also, if you have any other questions for me please feel free to send them my way!

That is all for another exciting week on the blog, see you back here on Monday for something from a long time ago in a galaxy far, far away! Until then...

For more samples of my work or to contact me regarding my availability head over to my website: www.christopherburdett.com

Monday, December 31, 2012

Working environment and schedule follow up

On Friday I answer a reader question about my working environment and schedule. There were lots of pictures and words, so if you missed it you might want to head over there and check it out. I mentioned in the post that there was a last minute addition to my home office/working area and I wanted to share that with you today. Well... I will share with you a heavily blurred image of it since I don't want to get into any trouble.

Previously, when working on monster stuff I would draw with my paper in my lap (I have drawn this way for ever it feels) or I would draw or paint at the opposite end of the desks from my computer. This has worked out fine until recently when my needs have begun to out grown this arrangement. Something larger and more ergonomic was needed to better facilitate my needs to paint and draw. Santa (my awesome wife) provided just want I was looking for this year and I have put it to immediate use...

 The new traditional work station for all my drawing and painting needs.

I have never been comfortable or like to work at an easel, a flat supported surface has always been my work environment of choice. I am sure the fact I have not painted traditionally until a year a go has a lot to do with that! This new drafting table allows plenty of room for lighting, reference, and for the actual piece I am working on. Still breaking it in, but I have successfully completed my first project at it and it has worked out marvelously. I don't know how I would have done it with out this addition to the office. Thanks, wife!!!

HOLY COW, this was the last post of 2012! How time flies! I will be back here on Wednesday for another exciting day on the blog and my first post of 2013! Until then...

For more samples of my work or to contact me regarding my availability head over to my website: www.christopherburdett.com

Friday, December 28, 2012

Reader Questions: Working environment and schedule

A while back I asked readers of this blog to submit questions they would like me to answer about art, working as an artist, or anything else relating to the industry. I received several great questions and it is long over due to start answering them. Starting things off, we have a question from Ashley…

Ashley asks:
"As a commercial freelance artist who has two kids (with a third on the way) I can't work full time but I am curious to know what a typical work day looks like for you. Where do you work and what does your daily schedule look like? How many projects can you do in a week/month?"

Thanks for the great question and I hope my answer will be helpful and insightful. I have mentioned this before here on the blog and I talked about it in more detail at Illuxcon during my lecture on 'Getting Serious', I do maintain a day job that allows me the opportunity to also work as a fantasy illustrator. The quick answer is that I work a 40 hour a week job as a designer and digital artist for a educational design house and I work a 40 hour a week (or more) as a fantasy illustrator. This is a choice that I have made, though at the beginning I really didn't know what I was getting into. But then again, when it comes to fantasy illustration, if we knew what we were getting into I am not sure how many of us would be in the industry!

Let's start off with what my days look like… Generally speaking, I work 7 days a week to some degree and most of my days are 17 - 18 hours long from waking up to falling asleep. I do make time for my wife, my friends, mountain biking three times a week, personal art time, and a little time here and there it catch up on sleep. I wake up at 7 am five days a week and arrive at my office ready to work by 8 am. I take an hour lunch, if I am eating alone I spend most of my lunch drawing on my own work, if I have lunch with friends I gladly ignore the drawing. I work generally till 5 pm, though a couple times a year due to deadlines my day job requires additional time. My wife works nights as an ER nurse and our schedules overlap in the mornings and evenings. This allows me several nights a week to an empty house where I can focus on working with only the cats to distract me. I generally start working on illustration work in the evenings between 6 pm and 8 pm, depending on what else is going on and I work until around midnight. At the latest I am asleep by 1 am. It all begins again at 7 am and this is usually repeated through the entire work week. I sleep in on the weekends whenever possible. This is a hard schedule to maintain, and I do so out of choice and love of the monsters.

As far as my working environment goes I have two very different offices for the two jobs I have. I have my day job office where I do my educational based work and I have my home office where I make my monster illustrations. I have some photos of both with some helpful diagrams to explain what you are looking at. Lets start things off with my day job office and finish up with the home office…

Daytime office
 
Daytime office wall


This office has a glass front, so you can see into it like a display room. My office is usually a stopping point when clients or university employees are brought through for meetings and tours. I on the second floor so the view out the window is nice… which is why I sit with my back to it so that I am not distracted.

Nighttime office

Nighttime office 


As you can see, my two offices are a little different depending on the work I am doing there. Looking at them now, it seems like their appearances are reversed to what you would expect. Originally, my home office was in our guest room, but I would be back there for hours on end and the wife wouldn't see me. We decided to move my work area out into the main area of the house and it has worked out very well. We had already divided the long room with a cough, so I just set up behind the cough and I can spend time with the wife and still work. The set up for the home office has changed over the years to better suit my needs. In fact, it has changed again since preparing to write this post. There has been a new addition, and I will share it with you on Monday since I have not had time to add it to this post.

Now the tough part of this question, how long does it actually take me to make a painting. This is tough because I never have the chance to just sit down and constantly work on a painting. I have my day job and other activities that separate my painting time into little blocks in the evenings and weekends. I will give you a general break down of the amount of time it takes me to do any given step of the process…

• Shooting reference: 1 - 2 hours
• Developing digital thumbnails (usually 3 thumbnails per piece): 1 - 3 hours (per individual piece)
• Producing the finalized pencil drawing: 1 - 3 hours (per drawing)
• Painting the final: 1 - 3 days (of actual working time, not days if the week)

I have had the chance to sit down and work only on illustration a couple times this year and this has given me a better understanding of how fast… or slow I work. I was able to finish a fully detailed isolated figure illustration in a single day of work and I was able to complete a quarter page with background in a day and a half. But having the time to just sit and focus on the painting for any longer then 4 - 5 hours is a rarity for me. I do get longer periods on the weekend, sometimes 10 - 12 hours and I can complete most of a painting in that time. My rule of thumb is that the painting part of the process takes 1 - 3 days worth of time. Sometimes it is longer sometimes it is less. As always, the more time I put into the thumbnails and drawing the less time I find the final painting taking me. I have found that allowing time between the thumbnail, the drawing, and the final painting allows me the chance to look more objectively at the piece at each stage of the process and allows me to catch potential issues that will need to be addressed. I also try to allow time between when I finish the painting and when I turn it in so that I can have a fresh look at it before I send it to the client, just to make sure I didn't miss anything.

As a rule I work on one painting at a time. I will work on all the thumbnails and drawings all at the same time, but when it comes to the paintings I will work on one until it is done and then begin on the next. I also work on the paintings in the order the client assigned them to me in the art order - a little superstition that I have always had. I will move entire assignments around in my work schedule depending on deadline though, but I do like to work on them in the order they come to me. This first come first serve work flow has allowed me to not make any scheduling mistakes or miss any deadlines.

My schedule is pretty packed and planned out for at least a month or two in advance. This does make it difficult to work with new clients, clients with a really tight turn around on deadlines, and surprise emergency pick up assignments… but I do my best to make things work for everyone. 99% of the time I err on the side of caution when it comes to accepting work and I have had to learn the hard skill of saying 'NO'. I have passed on some really exciting projects that I have waited my entire life to work on because I knew I would just not have enough time to take them. This really sucks, to put it bluntly, but producing substandard work or missing a deadline is worse for me. I am usually working on anywhere between 1 and 4 pieces at any given time. I aim to have 1 to 3 finished paintings each month. This allows me some little bit of a life outside of working while still allowing me to make my monsters. That said… I have 13 paintings to produce over the next month. This should be interesting!

I hope this answers all of the questions and addresses all of the topics. If there are any additional questions on this topic or if anyone would like anything explained further, please feel to leave them in the comment section below. Also, if you have any other questions for me please feel free to send them my way!

That is all for another exciting week on the blog, see you back here on Monday! Until then...

For more samples of my work or to contact me regarding my availability head over to my website: www.christopherburdett.com