Showing posts with label LoTR. Show all posts

Friday, October 18, 2013

Ungoliant's Spawn - Process

Way back in May I shared with you a big spiky spider that I did for the Lord of the Rings card game. Today I finally have for you the process that went into the piece as well as a look at how things didn't go as planned for this particular piece. So that we are all on the same page, here is how the final for the Ungoliant's Spawn turned out...

Ungoliant's Spawn
© 2013 Fantasy Flight Games

RAWR! Giant spider! Hard to go wrong with an assignment like that... but I almost found a way, but I am getting ahead of myself. Let's start at the beginning with some good ole thumbnails like I do every time I start an illustration. As with many other of my assignements for LotR the dimensions of the final card art needs to be more of less a square. I don't really want to make square illustrations. To make sure everyone is happy I plan out the piece to work in the required square and a personally more desirable rectangle. If I remember correctly this assignment came to me with a bit of urgency and I hit the ground running. I turned over the thumbnails rather quickly and included notes if my frantic scribblings were a little to chaotic...

Ungoliant's Spawn - Thumbnails
© 2013 Fantasy Flight Games

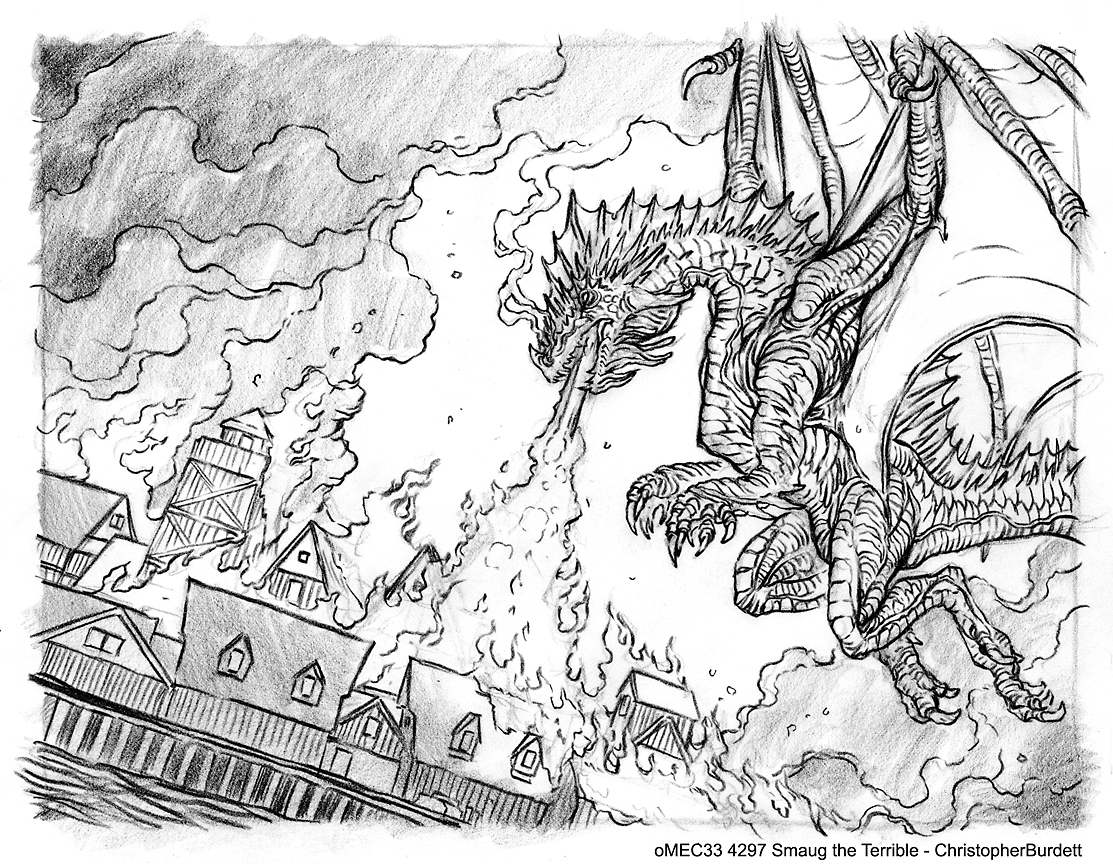
Option 'A' was a quick winner and I was sent on my way to make the final drawing... which I did... As mentioned before, this assignment had a bit of urgency around it. Which means I probably felt rushed... which means I probably didn't spend as much time as I should have on the drawing. This was my first mistake. Not a huge mistake... but like a snowball rolling down hill it soon got bigger. That was all still ahead of me, here is the final drawing...

Ungoliant's Spawn - Drawing
© 2013 Fantasy Flight Games

Now that I had an approved drawing I made some edits to the mouth of the spider and got started painting. When this was painted I was still using my older process. I touched on this last week as well. In six easy steps the spider took shape and came together really quickly...

Ungoliant's Spawn - Process Steps

Wait... wait... I said something about things not working out and almost messing up this painting, didn't I? Yes I did! Going into this assignment I had the big idea to do this piece traditionally. I got permission from my art director (Thanks, Zoe!) and she gave me the blessing to proceed... as long as I left time in my schedule to do it digitally is things hit the fan (this is when I pause and look you meaningfully directly in the eyes).

SO... I got started working on this piece in real paint. At this time I had a couple traditional pieces under my belt and I was feeling rather brave. What is the worse that could wrong? I would have to paint a giant spider twice... right... yeah... hurm... Anyway, I had a clear vision of what I wanted this piece to look like (see above process and finished piece to see what that clear vision actually was) and I got started painting...

Ungoliant's Spawn traditional process steps of what was never to be.

Yeah... I had lost control of my color almost immediately, among other things. That mouth that I rushed was causing me a lot of problems and I was trying to fix it in the paint which was causing more problems then it was solving. Needless to say, there is a lot of local color issues, color temperature issues, and a general lack of cohesiveness trough out the image... as well as the little fact the piece was spiraling further and further away from where I actually wanted to go.

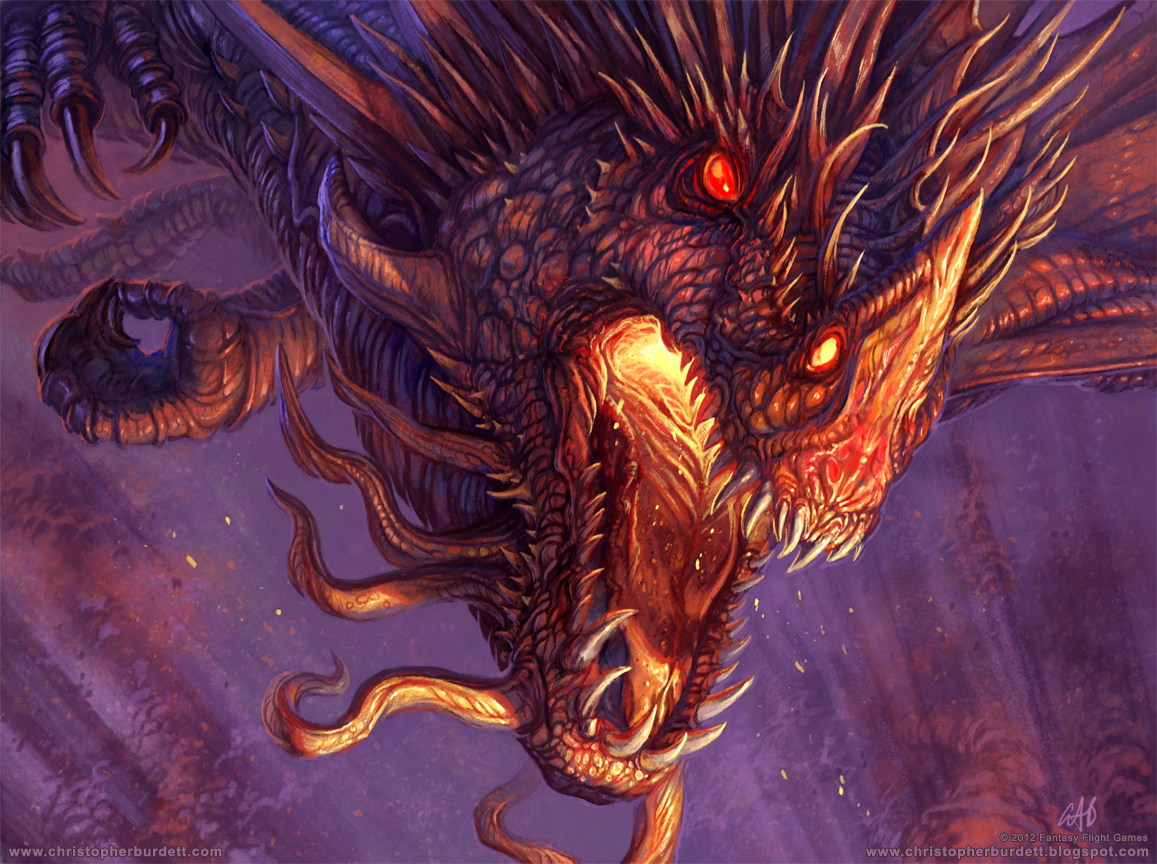
After a lot of work and struggle and some soul searching I decided to abandon my first attempt at making a traditional piece for a client and go back to my digital strengths. I of course quickly banged out a final piece that was better then I actually expected it to be as well as a piece that was very well received by the client. This left me a little frustrated to say the least. Since this personal set back I have produced two completely traditional pieces for clients, the most recent for Fantasy Flight Games. So in the end it all worked out and I just needed more time and practice. ...you know, that thing I have talked about time and time and time and time again here on the blog, all you need in the end to succeed is a lot of time and hard work. Maybe I am not just rambling incoherent nonsense here on the blog... or maybe I am and I just got one thing right...

Here again is how the final Ungoliant's Spawn turned out as well as a very bad scan of how the final card turned out with the cropped down selection of the art...

Ungoliant's Spawn
© 2013 Fantasy Flight Games

Ungoliant's Spawn in handy dandy card form!

That is all for another exciting week on the blog, see you back here on Monday! Until then...

For more samples of my work or to contact me regarding my availability head over to my website: www.christopherburdett.com

Monday, May 20, 2013

Ungoliant's Spawn

Spiders, for some the stuff of nightmares... for me, another day on the job. Today I have for you a recently released Lord of the Rings piece that I produced last year. If your local gaming store hosts an FFG Game Night, then you may have already seen this piece. Ungoliant's Spawn is part of the Passage Through Mirkwood Nightmare Deck that is part of the current FFG Game Night. Enough about all that, bring on the monster...

Ungoliant's Spawn
© 2013 Fantasy Flight Games

I was approached to create a big bad spider 'boss' for the nightmare deck and I aim to please. Though there were some ups and downs with this piece (which took place all on my end and will be addressed on another day), I am really happy with how the piece turned out. They wanted a 'RAWR!' worthy monster spider and I think I managed to give them that. Thanks to a search on the internet I was able to find an image of the final cars... though it is not the best image, it is more then I had before doing the search...

Ungoliant's Spawn in handy card form
(Thanks internet, even though it is blurry)

As you can see I once again produced a piece that I wanted to have while providing a piece that give the client something that they can use. I wanted a nice big wide image of a monster spider and they needed a square close up of a spider monster... WIN/WIN! In the coming weeks I will have a more thorough look at the steps and process that went into this piece as well as some thoughts on the ups and downs.

That is all for another exciting monster filed Monday, see you back here on Wednesday! Until then...

For more samples of my work or to contact me regarding my availability head over to my website: www.christopherburdett.com

Wednesday, May 15, 2013

Smaug the Magnificent - Process

Back in March I shared with you the two Smaug pieces that I have in the second Hobbit themed expansion to the Lord of the Rings living card game, On the Doorstep. Today I have for you the various production steps and process progression for the seconf of my two Smaug pieces, Smaug the Magnificent. Before we get started on how I went about creating it, here is how the finished piece turned out...

Smaug the Magnificent
© 2013 Fantasy Flight Games

Smaug the Golden was the first of my Smaug pieces and I looked to what I was designing and establishing in that piece to influence the direction of this card. All that said, during the thumbnail stage of this piece I was still exploring what I wanted to do with Smaug. Speaking of thumbnails, here are the three that I submitted for Smaug the Magnificent...

Smaug the Magnificent - Thumbnails
© 2013 Fantasy Flight Games

As mentioned before in the process of Smaug the Golden I included double crop marks on the thumbnails to indicate the size I was going to produce the actual painting at and the size required for the assignment. At the time, I think I was really interested in working on option "C". Funny, looking back at it now, I think I ended up doing something similar for the second set of Smaug pieces for the Gen Con set. As you can clearly see, option "A" was the winner and I moved forward on the drawing...

Smaug the Magnificent - Drawing
© 2013 Fantasy Flight Games

These were really fun to draw to say the least. I also thought I had done my job in providing a large enough image to allow for me to create the image I wanted and the image the client needed. Only one way to find out, stick the drawing in the template...

Smaug the Magnificent - Drawing mock up in template
© 2013 Fantasy Flight Games

Oh well... the image was not large enough on three sides, could have bee worse. The drawing was approved as long as I made sure to extend it as indicated in the mock up to fulfill everybody's needs and wants. The only thing left to do is paint this bad boy. For those that may have missed it, I went into a lot more detail about my drawing prep and my under painting process on this very blog last Friday. Here is a look at the process...

Smaug the Magnificent - Precess progression
© 2013 Fantasy Flight Games

In six easy steps... If I remember correctly, I think I ended up fighting with this one more then its partner, Smaug the Golden. For me, Smaug the Golden was such an iconic depiction that anything else just seemed to fall flat. It totally could be me... or not... but this was definitely not my favorite of my Smaug pieces. They can't all be your favorites, I guess. Here is how the final art turned out on the card...

Smaug the Magnificent in handy card form!

As an added bonus this art was reused as a part of the decklist insert that comes with the game. So I guess my views of this piece were not shared by everyone! Of course, I guess it is hard to hate a fire breathing dragon...

Smaug the Magnificent in handy informational insert form! 

That is all for another exciting Wednesday on the blog, see you back here on Friday! Until then...

For more samples of my work or to contact me regarding my availability head over to my website: www.christopherburdett.com

Wednesday, April 17, 2013

Smaug the Golden - Process

Back in March I shared with you the two Smaug pieces that I have in the second Hobbit themed expansion to the Lord of the Rings living card game, On the Doorstep. Today I have for you the various production steps and process progression for the first of my two Smaug pieces, Smaug the Golden. Before we get started on how I went about creating it, here is how the finished piece turned out...

Smaug the Golden
© 2013 Fantasy Flight Games

When I was first contacted to design and illustrate Smaug I knew I had to take the assignment and I also knew I had to NOT think about the fact that I am designing and illustrating Smaug... There is just so much baggage and history associated with certain projects and subject matters. For me to get through them it is best to not think too much about them and focus on making something 'cool' rather then making 'the MOST recognizable dragon in popular culture'. I needed to paint a really awesome giant red dragon laying on a pile of gold... okay, I can do that. The fact that it is Smaug with all his history and the various interpretations is not unimportant. I will make better work when I am concerned about the composition, light, color, and mood rather then worrying about the fact that this is Smaug from the Hobbit.

I went into this project with some thoughts and ideas about what I wanted to do with the look and feel for the dragon - much of which I would later go onto flesh out and build upon when I later worked on the three Smaug pieces for the Battle of Lake-Town deck. As always, I stated with some thumbnails. I was trying some things out and seeing what works and what does not at this point. There were several versions that were deleted before these three were submitted...

Smaug the Golden - Thumbnails
© 2013 Fantasy Flight Games

As you can see there are double crop points on the images. The square is for the client use and the larger rectangle is the size I will creating the art for myself... and for the client if they want to use if for additional purposes. There is no point in doing paintings of Smaug if I can't get something that will be usable beyond the life of the trading card. Option "B" was picked and I moved forward with the drawing...

Smaug the Golden - Drawing
© 2013 Fantasy Flight Games

I did just a little work on the drawing... This is where I finally worked out all my idea and decided on a final look and direction of my interpretation of Smaug. From this point on all my other Smaug work will refer back to this drawing and the eventual painting. I turned the drawing in and it was double checked on the card template to make sure I was good to go for the final illustration...

Smaug the Golden - Drawing mock up in template
© 2013 Fantasy Flight Games

Check twice, cut once...  Looks like I was not looking closely enough at all the chrome that these cards have and to make sure Smaug's nose was not hidden the art had to be shrunk to a smaller size then I anticipated. Move forward I needed to add the appropriate amount of additional image at the bottom. Remember kids, your art director kills a kitten every time you don't use the supplied templates! Think of the kittens and use you templates...

Now that I have an approved drawing with the caveat to add additional imagery to the bottom I moved forward with painting the final piece...

Smaug the Golden - Precess progression
© 2013 Fantasy Flight Games

It has been a while since I did the original for this so I am not really sure how long it actually took, but it feels like it went really quickly all things considered. I remember doing a lot of sitting and staring to make sure it was working and read well. Enough can not be said for simply sitting and reflecting on the piece. Not all the work is done with your hands. That stuff between your ears has a lot of work to do on a painting too. Sitting, staring, reflecting, and thinking are all important steps in the painting process. ...for me at least.

Here is how the final art turned out on the card...

Smaug the Golden in hand card form!

That is all for another exciting Wednesday on the blog, see you back here on Friday! Until then...

For more samples of my work or to contact me regarding my availability head over to my website: www.christopherburdett.com

Monday, March 4, 2013

The Hobbit: On the Doorstep

Smaug, the dire menace of  Middle Earth... You might remember the Smaug pieces I shared with you last August that I produced for the Gen Con 2012 Battle Laketown deck. At the time I mentioned that these were by no means the only or even the first Smaug piece that I had in store. Months before I produced the pieces for the Gen Con deck I was asked to design the great dragon Smaug and produce a pair of cards for On the Doorstep, the second of two Hobbit themed LoTR card game expansions. Here is how those first Smaug pieces turned out...

Smaug the Golden
© 2013 Fantasy Flight Games

Smaug the Magnificent
© 2013 Fantasy Flight Games

For me, there is no more of an iconic image of Smaug then of him slumbering on his treasure. It was hard to not jump at the assignment when I was told that this very image was one of the pieces available... also, getting to design and establish the look of Smaug himself was pretty hard to turn down. This of course led into me working on the Gen Con deck that allowed me to revisit and build upon the design I started with these two cards.

As with the other LotR pieces I have been producing I made the pieces nice and big for myself which then gave production a lot more to work with. Here are scans of the final cards so you can see how they turned out...

Smaug in handy card form... RAWR!

I will be bringing you a closer look at what went into these pieces as well as some other related images and notes in the near future. Make sure you keep an eye on the blog! A huge thanks to Zoe Robinson for getting me involved with this project! One of those projects you just don't want to miss out on.

That is all for another exciting Monday on the blog, see you back here on Wednesday! Until then...

For more samples of my work or to contact me regarding my availability head over to my website: www.christopherburdett.com

Wednesday, October 24, 2012

Burning of Lake-Town #3 - Process

Back in August I shared with you the pieces that I completed for the LoTR Battle of Lake-Town Gen Con 2012 expansion. Today, I have for you the process breakdown for the third and final Smaug piece completed for this expansion. Let's start off with having a look at the finish piece before jumping into the process...

The Burning of Lake-Town #3 (Smaug the Mighty)
© 2012 Fantasy Flight Games

Having already covered a great deal of the back story and shared in depth walk throughs with the first process post and second process post I am going to address the parts that are unique to this piece. The third piece needed to depict a "Single Attack". Talking with my art director we agreed an image depicting a bite attack or the moments just prior to the bite would be good for this piece. I instantly thought an extreme close up of Smaug's mouth as he descends to grab some unlucky citizen of Lake-Town in his mouth. I was immediately very excited about working on this piece and couldn't wait to start it. For me it was going to be very different from the rest of the Smaug pieces I have already done and be an interesting view I have never done before. I got to woke of the thumbnails and this is the one I submitted...

The Burning of Lake-Town #3 - thumbnail
© 2012 Fantasy Flight Games

With the the thumbnail completed and approved I moved forward with the final drawing.  I have shouted out into the internet about this before and I will do it again.... REFERENCE! Even though I am creating an imaginary creature it still needs to be based on the real world around us. I am also depicting the head of this imaginary creature at an extreme foreshortened angle. If any of this looks wrong or even just a little off it will detract heavily from this piece. I have a small alligator head that I use all the time to draw from to make sure perspective and foreshortening is correct for things like dragon mouths. With the proper reference to make sure everything looks and feels believable I moved forward with the final drawing...

The Burning of Lake-Town #3 - drawing
© 2012 Fantasy Flight Games

With an approved drawing I began working on the final painting. My new process was beginning to gel and I made quick work of this dragon. I was also really excited about working on this piece, so that helped my speed and enthusiasm. In nice easy steps you can make a line drawing turn into a dragon...

The Burning of Lake-Town #3 - process
© 2012 Fantasy Flight Games

This piece was approved without any revisions. Seeing it cropped for the card I feel that it may appear to read as if the head is disembodied. I tried to make sure that both my cropping and FFG's cropping provided an appealing image. For the most part I hope I was successful. Here is how the final card turned out...


One last look at my final version. This is the last of my Smaug pieces for the Battle of Lake-Town expansions, but fear naught, there will be more Smaug paintings from me later in the year! RAWR!

The Burning of Lake-Town #3 (Smaug the Mighty)
© 2012 Fantasy Flight Games

That is all for another exciting Wednesday on the blog, see you back here on Friday! Until then...

For more samples of my work or to contact me regarding my availability head over to my website: www.christopherburdett.com

Wednesday, October 10, 2012

Burning of Lake-Town #2 - Process

Back in August I shared with you the pieces that I completed for the LoTR Battle of Lake-Town Gen Con 2012 expansion. Today, I have for you the process breakdown for the second of those Smaug pieces. Let's start off with having a look at the finish piece before jumping into the process...

 The Burning of Lake-Town #2 (Smaug the Magnificent)
© 2012 Fantasy Flight Games

Since I went into so much detail and back story about this project in the first process post I am going to assume you are familiar with the main points and address the parts that are unique to this piece. This second piece needed to depict a "Fear Attack", the horrifying and impressive monster that is Smaug. I instantly thought of a nice worm's eye view looking up at Smaug being big and scary with the lighting silhouetting the head with glowing eyes and mouth. Which is what I was trying to covey in the thumbnail I submitted...

 The Burning of Lake-Town #2 - thumbnail
© 2012 Fantasy Flight Games

The thumbnail was approved and I moved forward with the drawing. As I mentioned previously, this project was under a really tight deadline and time was of the essence. I was rushing things where ever I could and once of the places, at least for this piece was the drawing. Rushing the early stages is something I have warned about many times here on the blog and here I was making the mistake I have warned against. This is how that rushed drawing turned out...

 The Burning of Lake-Town #2 - drawing
© 2012 Fantasy Flight Games

While the drawing was approved when it came tome to actually work on the painting I realized that my haste had resulted in a less then ideal starting point. Some of the anatomy was a bit of wonky and the over all piece lacked symmetry and things were misaligned. The other issue was that after completing the first of these new Smaug pieces I had made some modifications and improvements to make the over all design and look of Smaug more interesting. Before moving forward with this painting I needed to fix the mess my haste had created and I needed to make sure the dragon was depicted identically across the three pieces. Thankfully, fixing the drawing was a relatively straight forward and easy process...

 The Burning of Lake-Town #2 - revised drawing
© 2012 Fantasy Flight Games

Now that the drawing was squared away I was all set to move forward with the painting. Even though I was still getting comfortable with my new technique this piece came together quickly and easily once the drawing was fixed. Here is a break down of the painting process...

 The Burning of Lake-Town #2 - process
© 2012 Fantasy Flight Games

The piece was approved without revisions. I think I am can say without a doubt that the piece was well received because not only was it used for the intended card but the art was reused for the cover card of the entire set! Here is how the card and the cover card turned out, you can see how the cropping changed from my version to the version used...


One last look at my final version. I always find it interesting how I and other react differently to a piece. I always have a favorite when doing a series of paintings all at the same time. This is not my favorite, but it is obviously liked by the folks at FFG. As time passes, this piece is growing on me. I think that some of the goofs with the drawing started me off on the wrong foot with it. Oh well, looking at the final painting you would never know any of that...

The Burning of Lake-Town #2 (Smaug the Magnificent)
© 2012 Fantasy Flight Games

That is all for another exciting Wednesday on the blog, see you back here on Friday! Until then...

For more samples of my work or to contact me regarding my availability head over to my website: www.christopherburdett.com

Wednesday, September 19, 2012

Burning of Lake-Town #1 - Process

Back in August I shared with you the pieces that I completed for the LoTR Battle of Lake-Town Gen Con 2012 expansion. Today, I have for you a look at the process that went into the first of those pieces that center on the great red dragon, Smaug. Let's start off with having a look at the finish piece before jumping into the process...

The Burning of Lake-Town #1 (Smaug the Terrible)
© 2012 Fantasy Flight Games

I think I mentioned before that there was a really fast turnaround for these and time was of the essence at every step of the way. Since I had all ready designed and done a couple illustrations of Smaug for a yet to be released Hobbit expansion my AD wanted me back to do these Smaugs as well. It was hard to say no... in fact I didn't say no, I said yes... but I had to hit the floor running to make sure that I got them all finished up on time. I started these all off as I always do with thumbnails, but most of the ideas of what these needed to be was worked out via instant message and I had a bit of elbow room to just make them cool. Instead of detailed descriptions I was given the game mechanic idea that the cards needed to convey and I went forward with the thumbnail. This first card needed to be an "area / fire attech". I knew instantly what it needed to be...

The Burning of Lake-Town #1 - thumbnail
© 2012 Fantasy Flight Games

I only did the one thumbnail and it was approved. I usually do an minimum of three thumbnails for any piece, but most of the details were worked out verbally and I was confident that I was going to hit the target with the first shot. You will notice that there are two cropping boxes on the thumbnail. The small square is the proportions for the final card art that will be used while the larger rectangle shows the AD the piece I intend to make for myself. With the thumbnail approved I moved forward on the final drawing...

The Burning of Lake-Town #1 - drawing
© 2012 Fantasy Flight Games

Even though I had already designed Smaug for a couple previous pieces I felt there was room to more flesh out my design and give the old dragon a little more room to live and breathe. I didn't change my original design, but I did add to it, flesh it out as it were. Hopefully when all the pieces are compared to one another they will feel one and the same. I had to crank out these drawings really quickly, but they were all approved to move forward and that is what I did. I was about to leave for the Illustration Master Class but I was still moving production along on these. I got the under painting completed before heading out to IMC, but to be honest I just was not happy with it and not feeling really optimistic about where the piece was heading. In fact I was a little worried that I had three dragon paintings ahead of me and not a clear focus on what I was going to do with them. Here is that first attempt on the under painting...

The Burning of Lake-Town #1 - under painting #1
© 2012 Fantasy Flight Games

I have previously mentioned my ups and downs at IMC this year with my poorly timed sickness. What I might not talked about too much was the hour and a half talk I had in the studio with Peter Mohrbacher. Pete spent a little time at my computer before I collapsed and gave me some tips and suggestions on how to go about building up my paintings differently and how to get more out of my efforts. It could have been the mental fog of the sickness, but my mind was blown at what Pete showed me and my eyes were opened to the possibilities.  When I returned from IMC and was back on my feet I got to work with renewed energy on three dragon paintings. Here is a progress progression of the first piece...

The Burning of Lake-Town #1 - process
© 2012 Fantasy Flight Games

In the past most of my paintings would go from step 1 directly to step 5, but now I was spending more time building up a stronger value study under the color. I am not a big fan of doing digital color washes over a black and white painting. It was a method I employed early in my career and I now don't really like the look it gives. Some artists handle it beautifully, but I never felt that I did. With this new build up of layers you can use a grey scale more effectively... IMHO. The drawing is 100% the same as I have described in all my other posts, the middle grey is a multiply layer, the grey tones are a soft light layer, the color gradient is also a soft light layer, and the under painting (step 5) is a hard light layer. After this the painting is handled 100% the same as I would handle any other painting. What this new build up has giving me is a more dense, more complex color under painting that has better value and more interesting colors. Here are the two under paintings compared side by side...

The Burning of Lake-Town #1 - under painting comparison
© 2012 Fantasy Flight Games

The image of the left was my original under painting and the image on the right is the under painting created from this new method.  Look at what the is happening with the lines from the drawing in each image and look at what is happening in the lower right corner and in the building in the foreground. The values, hues, and saturation are all much more to my liking and much stronger in the right image. By using the image on the right so much more of the guts of the piece are worked out and established and I will end up spending less time figuring things out and fighting with color and value. This has been a profound change in my work and how I go about building up my paintings.  Still a lot to learn about this new method, but it already has been extremely beneficial.

Here is how the final piece appeared on the card, you can compare the cropping to my original thumbnail. As a side note, this piece actually got featured on two cards. Since I provided a larger image then I needed to the extra was turned into another card...


There is no way to know what the final painting would have looked like if I had used my previous painting process, but I feel that it would have been a greater struggle to reach the desired goal. Better results through quicker and better techniques is always nice... but I find that understanding WHY they work and WHY you are doing them is as important, if not more important.

The Burning of Lake-Town #1 (Smaug the Terrible)
© 2012 Fantasy Flight Games

That is all for another exciting day on the blog, see you back here on Friday! Until then...

For more samples of my work or to contact me regarding my availability head over to my website: www.christopherburdett.com

Monday, August 27, 2012

LoTR Battle of Lake-Town

For most of my life when I thought of dragons I would instantly think of Smaug. Smaug the Horrible, Smaug the Terrible, Smaug the MIGHTY! The Hobbit is a favorite of mine and I have read it several times over the years.  So when I was approached by Fantasy Flight Games to design Smaug for them and to do a series of paintings I jumped at the opportunity. When I was approached a second time to do even more paintings of Smaug, I jumped at those too! We are going to talk about the second round of Smaugs today...

If you follow the blog regularly you may have noticed from my reports from Gen Con that FFG put together a special set of LoTR cards for Gen Con 2012 and the set turned out to be the Battle of Laketown. They needed several hero pieces for Smaug and was happy to paint some more images of the big bad dragon. We were looking at a very tight turnaround for these, I was implementing a new technique on building up my paintings, and I was getting over being super sick at the Illustration Master Class... so it was a perfect storm for me to fall on my face or to do something that did not involve me falling on my face... This is what I came up with...

The Burning of Lake-Town #1 (Smaug the Terrible)
© 2012 Fantasy Flight Games

 The Burning of Lake-Town #2 (Smaug the Magnificent)
© 2012 Fantasy Flight Games

 The Burning of Lake-Town #3 (Smaug the Mighty)
© 2012 Fantasy Flight Games

I am really happy with how they turned out, and I am pretty sure so are the folks at FFG. I made them nice and big for me and made sure everything was where it needed to be for them. I learned a lot with these to say the least. The new technique has opened my eyes to some things and has allowed me the chance to better understand what I do as a painter. I will have a break down of the process for each of these in the near future. There will be more Smaug fun later in the year as well, but I can't say too much about that... yet. Here are some scans for the actual cards from the set so you can see how they got cropped for the game...


That is all for today, see you back here on Wednesday for some new Dungeons & Dragons work! Until then...

For more samples of my work or to contact me regarding my availability head over to my website: www.christopherburdett.com