Showing posts with label Halls of Undermountain. Show all posts

Friday, January 24, 2014

Spectrum 21 and Artist Selfies

Well... it is Spectrum submission time again. I have written about spectrum several times before here on the blog and you can read more HERE. Not sure I have anything new to add about Spectrum this year save that I did in fact submit some pieces for consideration in Spectrum 21. ...against my better judgment.

http://www.spectrumfantasticart.com/
If you are going to submit to Spectrum 21 you better hurry, the deadline is today!

I have absolutely no anticipations or belief that my work will get accepted, but if I don't submit I know that it is 100% certain that I will not be accepted. Unfortunately, the pieces I was REALLY excited about submitting I have found myself unable to submit. The License for these images is held by a rather larger company and I tried to acquire the permission to submit to no avail. My art director on the projects tried their best... no luck. I will try again for next year. The pieces fall in a weird gray zone between years so they may be still eligible for submission next year. Oh well... Spectrum time again, time for the best of the best to be honored and I have already established that I am merely, and happily, Okay

Hey! On a more positive and fun note, Lauren Panepinto posted a great article about artists and their reference selfies. She got some really great artist to contribute their selfie reference photos and the final illustrations that they belong to and shared them over on Muddy Colors. You owe to yourself to go check out the fun, especially if you don't know about Muddy Colors and especially if you are not using reference!

http://muddycolors.blogspot.com/2014/01/artist-selfies-everybodys-doing-it.html
Selfies... everybody is doing it... why aren't you?

Lauren did a call out on Facebook for additional artist selfies and I could not resist because I have SO many of them. I am every monster I make... so I have just a few silly photos laying around. SEE, all these years of me preaching about using reference is not some personal cause, EVERYBODY uses reference. For my submission of a selfie I went with my piece I did for the D&D Halls of Undermountain book, Wroot the Goblin. It was a fun photo shoot and I am happy with how the final turned out...

  Ridiculous artist selfie and final Wroot the Goblin
© 2012 Wizards of the Coast

Again, take some time if you haven't already to go check out Muddy Colors and the artist selfies! RAWR!

That is all for another exciting week on the blog! See you back here on Monday! Until then...

For more samples of my work or to contact me regarding my availability head over to my website: www.christopherburdett.com

Monday, December 10, 2012

Darktentacles Miniature

I received a really nice surprise from the blog last week.

Darktentacles mini by

 Now that is a lot of tentacles! RAWR!

 Another shot to show off their great work!

This is the image that Jan originally sent me. SO COOL!

Jan sent me a really nice email and told me about the creation of the miniature. I hope he won't mind if I share it with you here...
"I play Pen & Paper RPGs for over twenty years now, being the DM most of the time. At the moment my playgroup plays D&D 4th Edition and we wanted to try out (the excellent!) "Halls of Undermountain". I have quite a large collection of prepainted D&D miniatures and so normally I have a fitting miniature for every monster/NPC the heroes may meet. When my collection doesn't yield a needed adversary, I either buy one or - if there isn't one to find - I just build one myself.

This was the case for two monsters from "Halls of Undermountain". The Crawling Claws were not difficult (get two sets of minotaur hands from Warhammer Fantasy, glue to base, get ghastly painted - ready), but the Dark Tentacles made me really think. I am a fan of the Undermountain modules since the original one (Ruins of Undermountain) and the Dark Tentacles were always part of the setting. The version in Halls of Undermountain allows it to be encountered ashore, which I like because it makes it more "accessible". So I decided that your artwork should be the basis of the miniature to be created. I got a printable version from your website, printed it and discussed how to proceed with my friend Hilko, who works with miniatures as long as I am a Dungeon Master. In the end we decided that we would put a polystyrene "body" (about as large as a thumb) on a large base and add tentacles. Lots. Of. Tentacles.

Warhammer 40K to the rescue. A single Chaos Space Marine Spawn bit has 33 tentacles, which I glued to the body. This was not as easy as it sounds, because polystyrene and plastic needs quite some time until the glue dries. After that chore it began to look like there was a Dark Tentacle somewhere in it. Hilko added a leather cord for additional tentacly feeling. This is the one thing which we would do differently if we made a second miniature: we would use more leather cords and probably even leave out the polystyrol body altogether (using tightly wound cords instead).

Hilko painted the miniature with a gray base, added purple for the tentacles and liberally applied Games Workshop washes. For the eyes, he put paste (not sure about the word, the German word is "Leim") on the tentacles to create round protrusions. These he painted as seen on your artwork.

I asked the photographer of my company to make some better pictures for you. He applied a little bit of photoshop because he was not satisfied with the lighting, being winter and all." 
Thank again to Jan and Hilko for sharing their awesome miniature with me and honoring me with choosing one of my monsters to create! I will leave you today with the art of the Darktentacle...

Darktentacles
© 2012 Wizards of the Coast

That is all for another exciting Monday on the blog, see you back here on Wednesday! Until then...

For more samples of my work or to contact me regarding my availability head over to my website: www.christopherburdett.com

Wednesday, July 11, 2012

Trobriand's Machinations - Process

Today I have for you another look at my process that went into creating a recent D&D piece. This time around we are looking at the Scaladars for the Trobriand's Machinations article in Dungeon magazine #201.

As mentioned last week I figured I better go ahead and share my remaining process posts before August rolls around when I will be able to share my updated process for working up the under painting. You can always find more detailed explanation of my process on the blog HERE, HERE, and HERE.

As always when working on an illustration with a new creature I have to design I will do several roughs of the creature and several thumbnails of my composition for the illustration. With this Scaladar piece I had to design two new creatures and put them both in a narrow vertical composition. Luckily for me one of them is flying which makes composing them a lot easier. Since space was always a concern I had the composition in mind during the design process for these two mechanical scorpions...

Scaladars - Designs
© 2012 Wizards of the Coast

Scaladars - Thumbnails
© 2012 Wizards of the Coast

When these were all said and done I was leaning toward thumbnail "A" which had Shadowclaw Scaladar "A" and Winged Scaladar "B" in it. When feedback came back to me they concurred with my thoughts on thumbnail "A" but wanted the more naturalistic cavern interior for the background that is in "B".  I could totally get behind that decision, with pencil in hand I moved onto the more fleshed out drawing...

Scaladars - Drawing
© 2012 Wizards of the Coast

This piece depicts two new Scaladars, which are large scorpion like constructs created by a mad wizard (all the best stuff is created by mad wizards). One of the new Scaladar was a straight forward flying variety the second, the Shadowclaw, was infused with powers of the Shadowfell and had claws made of shadow like substance. Those shadow claws were my biggest concern with the entire piece. Dark cave + Scaladar made of black metal + claws made of shadows = my brain hurting to make sure it all reads and is clear. I sometimes feel I illustrate a lot of black creatures in black environments... while trying not to make either black. I got to work on the painting and hoped that it did not get out of control on me...

Scaladars - process
© 2012 Wizards of the Coast

And in eight easy steps it is all done... not really... This one took a bit of work and as easy as the Doom Hulk was this one was tough. As I feared those shadow claws gave me fits, but in the end I got them to work out. I had a good track record of late with final paintings until I got to this piece, I actually had to tweak it a tad after turning it in as per some notes from my art director. They were quick for the most part and really pulled the piece together. You can see what I changed in the final tweak in the last step of the above image. A lot of rim lighting going on with multiple light sources... I wonder if I am doing too much of this lately... who knows, but it is sure fun!

Here is the final piece in all its glory and your players now have some new lower level mechanical terrors to deal with...

Scaladars
© 2012 Wizards of the Coast

That is all for another exciting Wednesday on the blog, see you back here on Friday! Until then...

For more samples of my work or to contact me regarding my availability head over to my website: www.christopherburdett.com

Wednesday, May 16, 2012

Darktentacles - Process

I have for you today the thrid of the process posts for the recent work that I produced for the Halls of Undermountain. Today we wrap things up with the Darktentacles!

Thumbnails started things off as always. This time around there was not a lot to draw from immediately for reference, the big balls of tentacles usually come out of my head and that is were these manifested from. The Darktentacles was described as possibly lifting itself out of the water with a few if its tentacles. The tentacle are black and studded with eyes. There is not visible head, it is simply a mass of horrific tentacle goodness.  I can do that! The goal of the thumbnails was to come up with a pleasing mass that showed movement and allowed for a good reveal of the creature. I was on the fence on all of these and did not have a preferred choice, I would leave that up to production. In the end, "B" was the lucky winner...
 
 Darktentacles - Thumbnails
© 2012 Wizards of the Coast

There was one request, they wanted to see an element added to show the scale of the Darktentacles. Cave fish were suggested and I worked up a couple quick comps showing some options for some cave fish joining the party. This time around, "C" was the winner...

  Darktentacles - Revised Thumbnail
© 2012 Wizards of the Coast

Now it was time for the drawing. This was again one of those situations were once I was well into the drawing I pause and thinks, 'man, that is a lot of tentacles and eyes I now have to paint...' This is said mostly in jest, I do not mind working of complex forms with lots of detail, it just takes time and I need to approach the piece in such a way that I do not focus on all that detail too soon. I need to deal with the over all form first and make sure all the ground work is there before I go nuts with all the fine details. I left the background purposefully vague and empty. I planned on making sure there was cave interior back there but that was all going to come together in the painting stage once I see how the creature was coming together. The drawing was completed, turned in, and approved...

 Darktentacles - Drawing
© 2012 Wizards of the Coast

Now it is time to for the bulk hard work, the painting. Nothing has changed from my usual progression. Manipulated drawing, under painting, main paint level, adjustment and fix layers. You can see more detailed break downs of all this HERE, HERE, and HERE.

I mentioned earlier that I didn't shoot any reference for this piece since it was a ball of tentacles, I did of course use a lot of gathered images for reference in the painting stage. Cave interiors, animals with slimy dark skin, rock and water images were all used to make sure my decisions were all influenced by the world around us. Even when something is completely alien to the world, just a little real world added in will make it that much more believable. This piece did go very quickly and just like magic the images appeared before my unbelieving eyes...

 Darktentacles - Painting progression
© 2012 Wizards of the Coast

This piece has several elements that have appeared in other pieces that I have created in the last couple of years... dark cave, water, dark creature. I have been working to better envision these elements together... the black creature in the black water in the black cave... just use the paint bucket to cover the canvas in black and turn it in. I kid of course. The challenge for me has been to create a scene that on paper is completely black and to give it light and color while still making sure it feels like it is in a deep dark place. This is probably one of my better attempts at it. It gets to the point where if I think too much about it I will make it worse, so I just let myself go, have some fun and make sure the image as a whole is working...

Darktentacles
© 2012 Wizards of the Coast

This is the last of my pieces from the Halls of Undermountain adventure book. I still have two more recent D&D pieces that I have process information to share with you in the coming weeks.

That's all for another exciting Wednesday on the blog, see you back here on Friday! Until then...

For more samples of my work or to contact me regarding my availability head over to my website: www.christopherburdett.com

Monday, May 7, 2012

Snake Curse - Process

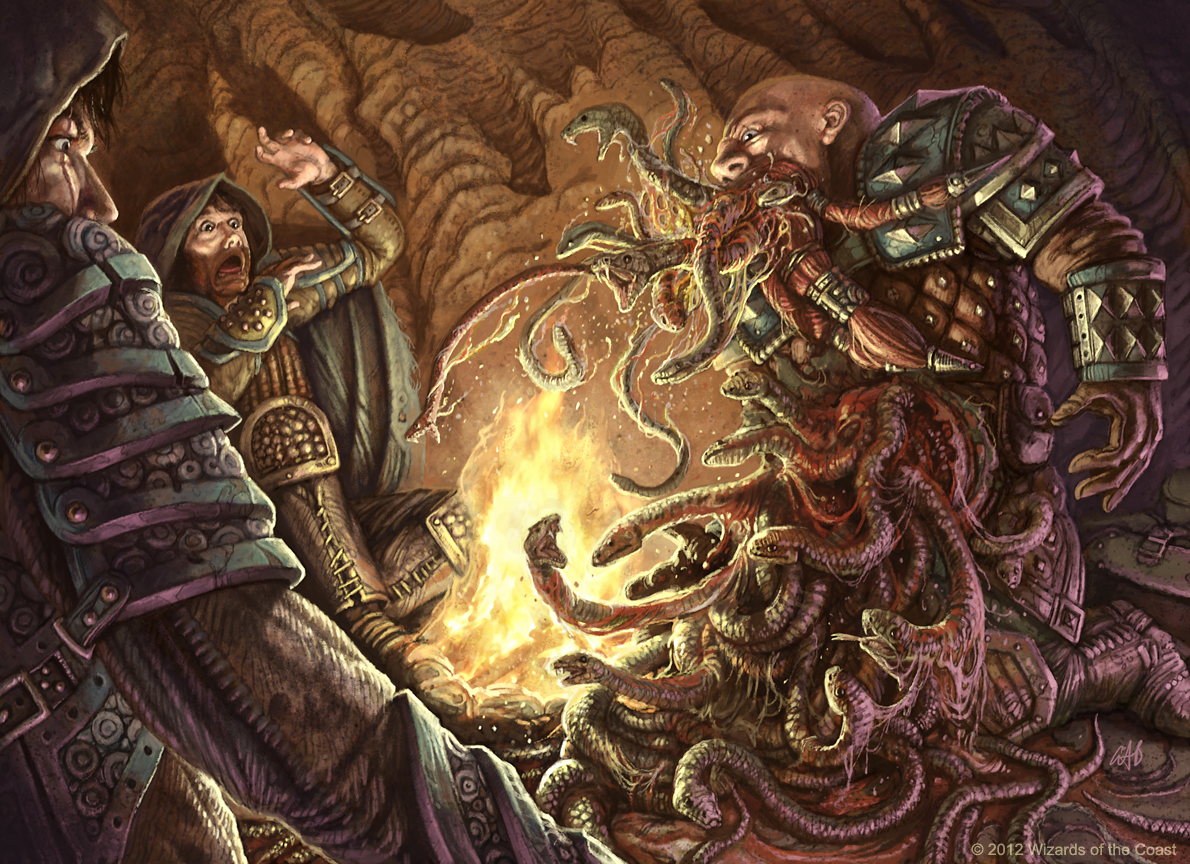
I have for you today the second of the process posts for the recent work that I produced for the Halls of Undermountain. Today we turn up the gross factor with the dreaded Snake Curse!

Thumbnails started things off as always. Well... I should say reference photos really started things off, but we will get to those in a moment. Once I had a feel for the physicality of the scene in my head and in photos I got to work on some thumbnails fleshing out my ideas. The piece is really about the exploding dwarf, but I wanted to be a little more involved then just a medium shot with the dwarf spilling all over the place. I thought having a foreground and background figure could allow some nice overlap as well as place the dwarf more within a space. After playing with the elements and options I had a really good feeling about 'C', and once submitted, 'C' was the winner...

Snake Curse - Thumbnails
© 2012 Wizards of the Coast

Now it was time for the drawing. This piece is all about snakes, and I knew I wanted to have a LOT of them. When I think about snakes I think about scales and when I think about a lot of snakes I grit my teeth and accept there will be lots of scales. This is when a fully fleshed out drawing can really help out. More and more I am realizing just how integrated my drawings are in my final painting. The details and work I am putting into my drawings are as important to my paintings as is the actual paint work I do later in the process. I can leave the details as they are, paint over them, or emphasis them as needed. I have it before and I will say it again, the more time and effort I put into taking reference, working out the thumbnails and fleshing out the drawing the quicker and easier the painting is for me. The drawing was completed, turned in, and approved...

Snake Curse - Drawing
© 2012 Wizards of the Coast

Let's jump back and have a look at some of the reference. More silly pictures of me acting out the scene. I am NOT posting the dwarf pictures... I have to have some secrets, and they were just a little too over the top for me to comfortably share on the internet. I did end up piecing together three separate photos to make the final dwarf reference. The upper body, lower body and left arm were all from different photos but provided me with the pose I really wanted for the piece. The other two figures were a lot more straightforward. There was a second pose for the rear figure I also really liked, but this one was the final winner...

Props, costumes, and correct lighting all help inform the reference which then better informs the painting. Everything works together to help me understand how different materials and forms will be affected by the scenes lighting.

Now it is time to for the bulk hard work, the painting. Nothing has changed from my usual progression. Manipulated drawing, under painting, main paint level, adjustment and fix layers. You can see more detailed break downs of all this HERE, HERE, and HERE. Though the differences in some of the later steps might seem hard to distinguish, there is a lot going on to the over all brightness, contrast, and detail level of the piece. Just like magic the images appears before my unbelieving eyes...

Snake Curse - Painting progression
© 2012 Wizards of the Coast

As will all my work I try to manage my time to allow me to finish the piece well before the deadline so that I can put it aside for a few days. This allows me the chance to see it again with fresh eyes and get a better look at for mistakes and areas that need to be adjusted. This use to allow me to catch some pretty big errors sometimes, but as years tick by thankfully the bigger issues are resolved long before the painting stage. Mostly these days the fresh look allows me to catch little things and to make adjustments that help the overall piece. Remember to 'kill your darlings' and if it is not working, fix it. It does not matter how long you worked on it, if it is wrong, it is wrong, make it right. And try to have some fun...

Snake Curse
© 2012 Wizards of the Coast

For the record, I am very much aware that a snake either opens its mouth or sticks out its tongue, but it does not do both at the same time. If this does in fact happen in one of my paintings, this was done purposefully for my own reasons.

That is all for another exciting Monday on the blog, see you back here on Wednesday! Until then...

For more samples of my work or to contact me regarding my availability head over to my website: www.christopherburdett.com

Wednesday, April 25, 2012

Wroot the Goblin - Process

I have for you today the first of the process posts for the recent work that I produced for the Halls of Undermountain. Starting things off is Wroot the Goblin!

This piece actually has is a really personal piece for me, and not just because of the silly reference photo you will find below. I followed the art order completely and for all purposes this goblin will forever be known as Wroot, for me and a handful of others, this is in fact Splug. Splug appears in the very first adventure module for 4th edition, Keep on the Shadowfell, and is a little NPC that could be played at the Dungeon Master's prerogative. Splug became fast friends with my players and he has joined in the adventure since and even now is still a faithful follower and a source for comedy. I had an image of what Splug looked like in my mind and when I read the art order for Wroot, I knew that I had an opportunity to make a painting of Splug, and I was very excited about getting started on this piece in particular.

Starting things off I did my roughs to get a feel for the character, gear and other props. The clear winner for me, and with my art director (though she liked them all) was option 'C'. I just needed to come back with some leg options, she felt ending him at a clean line of his clothing might make it feel as if he was a disembodied undead creature. A couple more updated roughs with legs and 'C' was the winner again...

 Wroot the Goblin - Thumbnails
© 2012 Wizards of the Coast

Wroot the Goblin - Updated thumbnails
© 2012 Wizards of the Coast

Once the thumbnail was approved I moved forward on the final drawing. I have said it a million times here on the blog and I will say it once more, the drawing is most likely the favorite part of the process for me and I really have to hold myself back to not get carried away and spend too much time on it. It is also the point of the process I suddenly look down at the drawing and think to myself, "Great, I now have to paint ALL those wrinkle, scales, horns, tentacles, etc... boy am I glad I showed no restraint in putting in as many as I could."
 
  
 Wroot the Goblin - Drawing
© 2012 Wizards of the Coast

This step is a little out of place, but I didn't want it to be the first image on the post! Before I start any piece I shoot reference. I make some very loose personal thumbnails to keep my thoughts together or at least talk through all my options with my wife who does all my camera work for me. I then the photos of all ideas, her ideas, and lots of happy accident to then more inform and direct the subsequent steps in the process. Sometimes I nail the idea I had perfectly with a photo we take, sometimes a much better direction is discovered once I see the photos. But in the end, physically getting into the mid set of the subject matter, with the props, the pose, the silly faces just really gets me more invested and involved with the piece and helps me get my head around what I am about to take on. This is the reference for the pose that was selected, it is actually a combination of two different photos taking the best elements to make the desired pose and prop combination...

Silly silly photo of me as yet another monster.
Points of interest: the red bag hanging off the backpack is my dice bag I use to play D&D; the two metal water bottles in front have been in SO many photo shots and subsequently have made in into the gear that a lot of my monsters carry; my first couple attempts of getting all this gear together and work as a backpack failed, so my wife had to tie everything onto the backpack and me as I stood there to get the shots we wanted to get. RAWR!

Back to the Goblin... Now that there was an approved drawing it was time to get painting. I continue to use the same basic process I have been using to paint for the last several years, you can find other more detailed explanation of this on the blog (like HERE, HERE, and HERE). Basically, I start with my manipulated drawing as the first layer, then a multiply under painting layer, then a standard layer where I do all my actual opaque painting, and finally there are a handful of layers used to make fixes, adjust areas, and do universal adjustments to lighting, contrast, or brightness. The bulk of the work is done with a layer 3, but without the time I put into the drawing and under painting layer the image would not exist. I have found as I continue using and refining this process that the more time I put into the drawing and the under painting the easier, quicker and less I have to do with the actual painting layer. Imagine that, a good foundation and planning makes the following steps easier...

 Wroot the Goblin - Painting progression
© 2012 Wizards of the Coast

And then, suddenly, like make there is a finished painting. Well, after many hours of work and many planned out steps and processes there is a finished painting. I continue to use the reference trough the entire process just to make sure I don't miss any subtle real world element that will add that little bit of extra reality...

Wroot the Goblin
© 2012 Wizards of the Coast

 That is all for another exciting Wednesday on the blog, see you back here on Friday! Until then...

For more samples of my work or to contact me regarding my availability head over to my website: www.christopherburdett.com

Monday, April 23, 2012

Trobriand's Machinations

Late last week a new article in Dungeon magazine #201, Trobriand's Machinations, went up on the Dungeons and Dragon website and I contributed a piece to the article! This is an expansion to the threats that dwell in Undermountain, so goes really well with my last post! Without further blathering, here are some Scaladars...

 Scaladars
© 2012 Wizards of the Coast

Scaladars are giant mechanical scorpion-like constructs. With the major exception of the lack of tentacles, these monsters have a lot of the major 'awesome monster' characteristics, so needless to say, they were super fun to work on. When I do a walk through for this piece in the coming weeks I will talk a little more about my influences and real life reference for this piece. Again, I would like to thank Kate Irwin for involving me on this project and for being super helpful in all her art direction!

That is all for another exciting Monday, see you back here on Wednesday! Until then...

For more samples of my work or to contact me regarding my availability head over to my website: www.christopherburdett.com

Wednesday, April 18, 2012

Halls of Undermountain

Halls of Undermountain is here! Halls of Undermountain is the newest adventure supplement for Dungeons and Dragons and I am extremely pleased to have been a part of this project. Enough talk already, here are my contributions to the book...

Wroot the Goblin
© 2012 Wizards of the Coast

 Snake Curse
© 2012 Wizards of the Coast

 Darktentacles
© 2012 Wizards of the Coast

I would like to extend a heartfelt thanks to Kate Irwin for including me on this project. She continues to be an amazing art director to work with and I look forward to every chance that I have to do so. As you can see I produced a total of three pieces and had a blast on all of them. I will share my thoughts and feelings on all of them in a future post when I talk about my process and the steps that went into each of these. There will be lots of sketches, drawings and most likely some extremely silly pictures of me posing for reference! I am happy to say that this is not the end to my Undermountain fun, I should have another related piece to share with you later this month! To see all these things and more be sure to stop back by the blog in the coming weeks!

That is all for a new art filled Wednesday, see you back here on Friday! Until then...

For more samples of my work or to contact me regarding my availability head over to my website: www.christopherburdett.com